Thursday, April 9, 2015

De-Mystifying the Rachael/Reuben Pannini Family Supper

You can make a reuben using this technique; if you enjoy corned beef, that is.  I personally prefer the rachael which is made using roast turkey.  A more satisfying and delicious sandwich, you won't find.   This isn't so much a recipe post as it's a how-to post.
 
step by step rachael sandwich
Here's the problem with making your family a batch of rachaels for supper, you've got to be really ready to move.  There's no time for day-dreaming here.  Remember your 7 P's and you will be fine.


Before you do anything, get your ingredients out and do any prep work you can before you need it.  Drain your kraut, butter one side of all the rye bread you will be using (I like Russian rye), two slices per sandwich (that may be obvious), lay out your turkey in neat piles on a plate, however many slices you want per sandwich, I find that 3/4 pound of turkey makes four nice sandwiches for two parents and two littles.   Have your Swiss cheese sliced and ready.  Open up your Thousand Island dressing, have a knife handy for slathering your sandwiches.

Okay, prep work complete, let's get to it.  While you are cooking, make sure you have any side dishes ready to go and that your kids are setting the table and have your plates out so you can toss a toasty, warm panini down for immediately consumption.

Preheat a frying pan over medium, medium-low until nice and warm.  Have a smaller, heavy frying pan ready to do some sandwich smashing.

Now, go!


Place one slice of buttered bread in hot pan, buttered-side down.  Quickly smear Thousand Island dressing on.


Place on your neatly portioned turkey.


Smother or lightly top the turkey with kraut.  I prefer to smother, my kids prefer not to know kraut is on their sandwiches, but I still put on a light smattering of the pungent stuff for them.


Next comes a slice of Swiss cheese.  Which you will then top with another slice of bread, buttered side up.


Smash the heck out of the sandwich with a heavy frying pan.  You want to toast the sandwich and melt the cheese and make everything warm and gooey. 


Don't burn your sandwiches!!!  You will probably need to turn your burner down the more sandwiches you make.  As soon as one sandwich is toasted on both sides and lovely and golden and melty, don't just stuff your face, give it to a family member and quickly repeat the process until everyone in your family is noshing gleefully.  These cook up so quickly you won't need to wait too long before enjoying one yourself.

Rachael Sandwich how-to
Yum, yum, yum!!!  You might wonder if I want some sandwich with my kraut.  Maybe.

Thanks for reading!

Heather


Monday, March 23, 2015

How to do Glamping Part II

If camping ain't easy, I don't want to camp.  So I spend my off-weekends, planning how to make each successive camp-out that much easier. It starts with planning, planning and more planning.Take a page from my years of experience to make your next camp-out a breeze.

This is my second post on how to make glamping easy.  Click here for other tips and tasty recipes from the post, How to do Glamping.


The easiest way to make your camp-out easy, if you ask this mom, is to make the meals and snacks as low-pressure as possible. When the food is easy, you can spend lots more time doing the fun stuff.

First, plan what you're going to eat for each meal. I have a meeting with my fellow moms and together we decide what we are going to eat and when.  We usually plan to eat as a group a couple times during the camp-out, typically we'll each make one dinner and one breakfast for everyone.  Then on the days we aren't sharing food, we still make similar things, like hot dogs, chips and fruit on the day we get there, because, really, who wants to cook after you've just set up camp.


Tin foil dinners are always a classic if you've got a spare night. Pre-pack each pouch before you leave with the meat, rice, veggies and seasoning, freeze them and store in a zip-lock bag to avoid cross-contamination.

My number one rule about cooking while camping is to prep as much food as I can while in the comfort of my home kitchen, then pack it away in ready to go pouches.  There are a number of reasons for this rule.

1-I don't want to clean while I'm camping.  This includes (especially) washing a bunch of prep dishes.  Ugggh.
2-Cooking is much more difficult in the wild outdoors.  Cook where it's easy.  I have camped with only a very small table before.  Can you imagine trying to chop onions and peppers and make meatballs with no prep space as most of the very small table was already being used by a water jug and a myriad other things. I learned a lot after that camping trip.
3-I'd rather be having fun, than cooking.

Dinner

You can take anything camping.  Imaging how easy it would be to take tacos.  Cook your meat, cool it and stow it in a plastic zip-lock bag, then freeze it to help with spoilage.  Then when you get to your campsite, you only have to thaw it and warm it up. Pre-shred your cheese. Chop some lettuce. Pour salsa in a zip-lock bag. A baggy of jalepenos, some sour cream and tortillas. Or, even easier, make a Dorito Pie.  Buy individual bags of Doritos, toss all your taco fixings in and devour, no tortillas needed.


An easy, dutch-oven dinner is giant meatballs and veggies.  Take some ground beef, bread cubes and salt and pepper and wrap meat around a Laughing Cow cheese.  Freeze them on a cookie sheet individually and once they are solid, throw them all in a zip-lock bag.
 

Bunch of vegetables: I like potatoes, carrots and onions, a little pre-chopped garlic and already diced green onions for garnish.  Par-boil your potatoes and carrots.  Saute your onions in advance also.  Pack everything into a well-labeled zip-lock bag, everything in one giant bag, individually bagged inside the bag. I keep everything separated in their own individual bags to keep flavors from melding.

Time to eat: Make sure you have plenty of hot charcoal on the bottom of your dutch oven and plenty to go on top. Throw some oil into your dutch oven, once the oil gets hot, toss in your garlic, saute it for a minute and then throw in your meatballs.  Brown the meatballs, throw in your veggies and sauteed onions, add a can or two of cream of mushroom soup, let cook until the meatballs are cooked through and you have a nice, satisfying meal.


Rice Salad is always nice to take with because none of the ingredients will get soggy between when they are packed and when you want to eat. Pre-cook everything, the rice, the bacon, chop the pepper and olives all in advance, bag everything individually and then pack all the ingredients into a large bag. Click here for my rice salad recipe!  This is a great side dish for hot dogs or if you're just having sandwiches. And when you want to assemble the salad, everything is right there ready to go, and all that is needed is a large bowl and spoon for mixing.

Lunch


My go to lunch.  Because I want things low-fuss and I have a personal issue regarding soggy deli meat, I love the ease of peanut butter and honey tortilla roll-ups.  It means I don't have a loaf of bread to get squished and my kids and husband alike will eat these happily.


Chips. These make a good side-dish as well as an easy snack.

Breakfast

I always cook breakfast when we camp.  Do I always cook breakfast at home?  Hell, no!  Camping though, is special.


An easy way to store eggs is to crack as many as you'll need into a large-ish container with a lid. I've used a kefir bottle and it worked beautifully. It's kind of an adventure watching the egg yolks get sucked down into the bottle, you cross your fingers and hope there isn't any over-flow. Note I have labeled this bottle of kefir, eggs. 


Frozen, pre-cooked sausages. They are easy to throw on a griddle and I like having protein at breakfast.


Pre-assembled biscuit mix.  As you can see the proportions here are enough for two batches of biscuits, and yes, I bake them in one of my dutch ovens.


I drink a lot of kefir, obviously, but this kefir bottle has regular milk for my coffee and the water bottle with the initials, BM, ummmm, is butter milk for my biscuits. I could have bought a quart of milk, but I had the kefir bottle empty and felt I could polish off the gallon of milk I already had.


Ham steak.  This is so I can fry it up and serve it with my biscuits for breakfast biscuits.  Fresh biscuit with a slice of salty, smoky ham on it with a side of eggs.  Yes please!

I also always have pre-made pancake batter, butter and syrup as my kids and husband are always happy to eat pancakes while camping.


If you drink coffee or tea for breakfast bring it. I like instant coffee packets for their ease of use and cleanliness.  Don't forget the sugar and creamer if you take it. You'll also need a tea pot to boil your water.

Snacks


Whatever your kids like to eat.


Whatever your husband likes to eat.


Whatever you like to eat.  Learning lesson, the un-wrapped Reece's minis melted and became a giant mass of chocolate and peanut butter.  The M & M's and taffy worked much better as camping treats.  Bring more snacks than you think you'll need.  You're always hungry while camping.


Individually packaged cheese slices.  Genius.

Dessert

S'mores.  Every night.  These s'mores were made by sandwiching the marshmallow between an Oreo.  Yummy!

 You may be asking yourself, is all this work worth it?

Oh yeah.
Happy glamping!


Monday, March 16, 2015

My Mama's Lemon Pistachio Biscotti

Does your mother make biscotti?  Mine does and it is so good.  It's so tasty that when The Mister and I were on a date a couple Saturday's ago, we wandered into a coffee shop and he spotted their biscotti offerings and immediately asked if I'd make him some.


Now, if you've ever had to shell 1 cup of pistachios, you might understand my slight hesitation before joyously agreeing to make them.  Then, later that week, I may have mocked my beloved husband's childhood fear: clowns under the bed, demonic trees and pink sludge...and so, needing to repent for my cruelty, promptly made them as an, I'm sorry, my dear, clowns really are scary and I'll look under the bed to make sure there isn't one trying to drag you under every night for a month and I apologize a thousand times for teasing you.


p.s. shelling a cup of pistachios really isn't that bad.  Just get comfy and know the tips of your fingers might feel it a bit after you're done.


The reward though, is epic.  The sassy tang of lemon, the salty crunch of pistachios and the sweet smoothness of the white chocolate harmonize into a glorious song on your taste buds.  Seriously yum.


If you don't know much about biscotti, I'll give you a tiny lesson. In Italian it means twice baked.  K, I am going to break it down for you. Bi=2 and scotti=cooked...ummmmm...yup, I'm going to go out on a limb here and say scotti is cooked, so there's your Italian lesson for the day.  :)


Enough Italian.  To the cookies!

Lemon Pistachio Biscotti
1/3 C. Salted butter, softened
2/3 C. Sugar
2 tsp. Baking Powder
1/2 tsp. Kosher Salt
2 eggs
2 tsp. Vanilla
2 C. Flour
Lemon zest from 2 lemons
1 C. Shelled, salted pistachios, coarsely chopped.
1 C. white chocolate chips, melted

Preheat oven to 375 F.

In large mixer, combine the butter, sugar and baking powder and beat on high until creamed.  Add the eggs and vanilla and mix until smooth. Scrape sides as necessary.

Reduce mixer speed to low and add flour 1 cup at a time.  Do not over-tax your mixer, if it can't take the  workload, mix by hand.  Add the lemon zest and pistachios and mix until just combined.

Place parchment paper on cookie sheet and divide dough into 3 equal piles.  Shape each of these into an 8 inch roll.  Place rolls 3 inches apart and flatten until they are approximately 2.5 inches wide.

Bake for about 20 minutes until they are golden and the tops are just cracked.  Cool for 15 minutes until you can handle them without burning yourself.

Reduce heat to 325 F.

Using a sharp serrated knife, cut into 1/2 inch slices and place the cut-side down on the same cookie sheet and bake for 8 minutes.  Turn over each cookie and bake for another 8 to 10 minutes until dry and crisp.  Let cool completely.

Dip bottom of each biscotti in melted white chocolate and place, chocolate side down, on clean piece of parchment. Drizzle tops of cookies with additional melted chocolate, led solidify and eat to your heart's content.


The best breakfast imaginable, a cup of coffee and a couple biscotti.  Yes, please.

Mom, can I try a biscotti?  I love pistachios.
Sure, give them a try.

Ohhhh, these taste good.
I'm glad you like them.

Can I have another one?
Nope, one's enough, besides, Mommy has to have a couple for breakfast tomorrow.

I hope you make these and enjoy them as much as my family.

Thanks for reading!

Heather


Tuesday, March 10, 2015

Pot Sticker Stir-Fry and Fried Rice Dinner

The hardest part about making a stir-fry from scratch for dinner, is getting the timing right.  It's so easy to get overwhelmed if you don't have a game plan and prep accordingly.  I'm going to lay out the process, step by step, so you can have a tasty, healthy feast to present to your family, with everything done at about the same time. 

I can't say anything but YUM about my pot sticker stir-fry with fried rice dinner.  The really great thing about this meal, is that it's customizable.  Go with produce that's in season: cabbage in winter, asparagus in spring and squashes in summer.  If you don't have ham for the fried rice, toss in some turkey bacon like me, or go vegetarian.  It's all good.

Get ready, while it's not difficult, there's a lot of steps to get everything just right and at the table at the same time.  You must allocate at least an hour to cook.  Part of this time is for the rice, since I'm never on top of things enough to make the rice a day ahead.  If you are completely awesome, go ahead and pre-cook the rice.  This will save you some time, but remember, you still have to allow time to prep the rest of the ingredients.


Ingredients for Stir-Fry
1/2 onion, diced
pile of carrots, sliced into matchsticks (these are always in season)
Vegetables, a whole bunch of them: Mushrooms, Zucchini, Asparagus, Summer Squash, Broccoli, Cabbage,  Bean Sprouts, water chestnuts...sliced and chopped as appropriate (for my stir-fry, as it is March, I used a combo of winter veggies and early spring veggies: red cabbage, carrots, asparagus, bean sprouts and water chestnuts) but you can use whatever you like!
Veg. Oil
Terriyaki or Stir-Fry sauce of your choice
salt
Frozen Pot stickers 

Ingredients for Fried Rice
Rice, about 1.5 cups, uncooked
1/2 package of  frozen peas and carrots
other 1/2 onion, diced (see above)
2 eggs, whipped
Soy Sauce, to taste
Sesame Oil, to taste


Step1: Cook Rice according to directions.

Step 2: While the rice is cooking, cut all your vegetables!  I like to segregate them onto plates according to how long it takes to cook as you will add them to the frying pan in the proper order. Carrots, cabbage, broccoli and onions etc...need to be cooked first.  Asparagus, zucchini, muchrooms and bean sprouts etc... need to go in last. Cut as much as you feel your family will eat.  I cut plenty as I wanted enough for left-overs the next day. Set aside until needed.

Step 3:  Whisk your eggs and add a couple TBL soy sauce.  Set aside until needed.

Step 4: Dice up protein.  Ham, turkey bacon or don't if you're not going to use it.  Set aside until needed.

Step 5: Get out two frying pans.  One for your stir-fry and one for your pot stickers.  Prepare pot stickers according to directions.  And at the same time, add a couple TBL veg oil to the other, heat over medium and add 1/2 diced onion.  Saute until softened.  This will take about 8 minutes.

Step 6: Continue to cook pot stickers according to directions.  Turn on oven to 200 F. At the same time, as long as your onions are softened, add all the longer-cooking vegetables to your stir-fry pan, increase heat to about medium-high.  Season lightly with salt. To encourage faster cooking, you can throw aluminum foil over them.

Watch your pot stickers, as once they are done you will remove them to an oven safe plate and put them in your oven until the rest of your meal is complete. 
 
 Step 7: After your pot stickers are done cooking and staying warm in the oven, continue cooking your stir-fry vegetables, stirring regularly.  At the same time, using the same frying pan as the pot stickers were cooking in (wash it if it needs it), add 2 TBL veg oil and heat over medium.  Add remaining diced onion.  It's fried rice time!  Cook until softened.  Watch your stir-fry vegetables.  They should be slightly softened.

Step 8: Here is where I failed you on pictures, saute your fried rice protein (ham or turkey bacon if you're me) with the onion.  At the same time, add the quicker-cooking vegetables to your stir-fry pan.  Then add the frozen peas and carrots to your fried rice pan.  Stir both pans regularly.

 Step 9:  Turn heat down to about medium, medium-low. Add your whisked eggs and soy sauce mixture to your fried rice pan.  Try and keep them slightly segregated from the rice mixture (it will be impossible to keep them completely separated). Once the eggs begin to cook, mix them in with the rice and them let fully cook.  Taste.  I almost always think my fried rice needs a bit more soy sauce.  Add a few dashes of sesame oil. Season to taste.

Step 10: Keep checking on your stir-fry.  Once the vegetables are nicely cooked, not over done with just a touch of bite to them, add your sauce of choice.

Step 11: Plate and devour!  Scoop a bit of rice, some stir-fry and top with your warm pot stickers (you can include the pot-sticker sauce as a condiment if you wish).

Nom, nom, nom. 

See, that wasn't too difficult and your family enjoyed a healthy, flavorful meal and all it took was a little careful timing on your part.

Thanks for reading!

Heather


Thursday, February 19, 2015

Hi. Remember me?

No excuses.  Life sometimes gets in the way of blogging.  That being said, here's my latest creation.

I like it.  A lot. 

appliqued fox pillow
It's a little, fox pillow.

A girl fox, as my Youngest would insist you notice. 

Because, clearly girls are better than boys. 

I machine appliqued it, using black thread to help it stand out from the bold turquoise back.

Threw on some fabric from my favorite new design house, Cotton And Steel (they're some pretty cool chicks over there).  And called it good.

Hope you like it, too.  My daughters are both fighting over who gets it.  Luckily their mama is a genius and is planning on making #2 tonight.

Thanks for reading!

Heather

Wednesday, December 24, 2014

Merry Christmas 2014

Hoping for the best holiday season ever as you celebrate with your family and loved ones.

I'll be seeing you in 2015!

Lots of love,

Heather

Tuesday, December 23, 2014

Last Minute Christmas Favorites

Now's the time for anything that's lickity split. These are all tried and true and if made, your praises will be sung from the tops of Christmas Trees.

Appetizer


Best Mini Pigs In A Blanket w/ Cheddar and Sausages

Dessert


Homemade Cranberry Bliss Bars


Heath Bits Toffee Butter Cookies


Triple Chocolate Oatmeal Cookies with Fresh Cranberries

Main Dish

 
The Best Shrimp...Ever

Warm Beverage to serve your visitors


Dirty Chai

Quick Projects...in case somebody is bringing you an unexpected present.  Gulp.


Deer Pillows


Dresden Plate

Happy Holiday-ing!

Heather

Friday, December 19, 2014

No Chill, Easy as Pie (easier) Sugar Cookies...And they're delicious, too!

Tis the season for cookies. It just is.  I can't imagine the Christmas season without inhaling several dozen varieties of this sweet delight.  Cookies are just about the perfect treat, too.  They're little, but they have such a huge variety that you can never get bored with a cookie.  One of my favorites is one of the simplest, sugar cookies.  Soft and pillow-y, sweet but not too sweet (until you add the frosting) and comforting as can be.  Plus they're dang fun because you get to cut them out using fun cookie cutters and decorate the heck out of them.  They're a good time.

no chill sugar cookie
There are several reasons my sugar cookies are the best.
* You don't have to chill the dough before baking.  This means when the need for sugar cookies arise, you can have some made in less than 30 minutes.
* They are so yummy!
* They're fun to decorate...I guess this is the case with any sugar cookie, but trust me, mine are the best.
* They always turn out perfectly.
* You don't have to get your giant mixer dirty.  They're so easy, you make them by hand and don't even break a sweat.  You do need your mixer for the frosting though....


Making sugar cookies is a no-brainer for me, I just happen to almost always have the necessary ingredients in my pantry and my family just, really loves them.

EASY NO CHILL SUGAR COOKIES
Makes approximately 3 dozen cookies, depending on thickness of dough and size of cookie cutters **see above picture**

Preheat oven to 400 F.
Line cookie sheets with parchment paper

5 C. Flour (have more on hand for flouring your surface, and I always need more to get my dough stiff enough)
2 C. Sugar
3 tsp. Baking Powder
1/2 tsp. Salt

Combine the above ingredients in a large bowl.

1 C. Shortening

Cut this into the above flour mix by hand. I just mush the shortening around in the dry ingredients with my fingers until there are no large chunks left. Make a well in the middle of your dough mixture

3 Eggs, beaten
1 C. Milk
1 tsp. Vanilla

Combine the above ingredients together and then pour into the well in the dry ingredients

Gradually blend the flour mixture to the wet ingredients until all flour is incorporated. The dough is likely to be very sticky now.  I place the dough onto your very clean and liberally floured counter top and knead flour into it until it is no longer sticky and won't adhere to your surface when rolled out and cut. 

Grab your rolling pin. Roll your dough to 1/8" - 1/4" thick.  Test if it is sticking at this point. If it is excessively sticky, grab up all the dough and knead in some more flour. If it's just a bit tacky, pick up each corner of your dough and toss some more flour under it. If your dough sticks at all to your counter top, the shapes you've cut will not come off cleanly and will not be as beautiful...oh, they'll be tasty, but we're after looks too with these cookies.

Cut dough using your favorite cookie cutters.  Re-use the scraps!!  This dough is very forgiving and doesn't get tough.  I have rolled and re-rolled my scraps many times and the results are delicious every single batch.

Place on parchment-lined cookie sheets. Don't get them too close to each other, but don't worry either, these cookies don't really spread much. So you can get away with an inch between.

Bake for 8-10 minutes. They should not be brown at all, but remain lily white on top and lightly golden underneath, but not gooey in the center.

Allow to cool on paper towels completely.

Decorate with Frosting. YUM!


VANILLA BUTTERCREAM FROSTING
3 C. Powder Sugar
3/4 C. Salted Butter, softened

Combine the above ingredients in the mixer until well mixed

1 1/2 tsp Vanilla
1-2 Tbl. Milk

Add to creamed mixture and beat until smooth and fluffy and spreadable. Add food coloring and mix well. Pipe or spread this on your cooled sugar cookies.

It's fun to personalize these cookies with names or just by tossing on as much frosting as you think acceptable in fun designs.  This frosting is so good, please don't buy store-bought frosting any longer.  This one is easy and delicious, but I would say use regular, salted butter as it lends a bit of complexity to what could be overly sweet if there was no salt in it. 

Make these, everyone will thank you.

Thanks for reading!

Heather


Wednesday, December 10, 2014

Homemade Christmas

I thrill at an after Christmas sale as much as the next person.  The opportunity to buy a holiday gem at half price and get to add it to my holiday decor the following year.

What I love even more than sweet savings, though, is to create my own Christmas crafts during the holiday season....as long as they're simple and I won't tear my hair out trying to figure out something complicated.  The Christmas season is not the place for complicated.  I want to be able to enjoy the process and make it start to finish in an evening or less.

Here are my favorites.  Most use simple felt, thread, embroidery floss, ric rac and the occasional button embellishment.  Oh, and a pile of beads and wire, and some serious help from the bead lady.

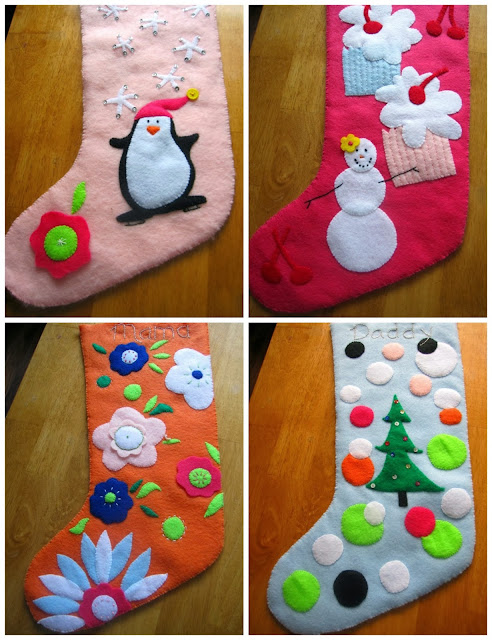
homemade felt stockings
Santa has special stockings that he puts goodies in for my crew.  They are ones that Mama personalizes and sets aside Christmas Eve for him to fill

Construction is simple enough.

Cut out two pieces of felt in the shape of a stocking.  This took me a few times to get the size just right, so they were big enough to fill with presents...or coal.   So, draw out a stocking template bigger than you think it will need to be. You can always cut it down if too big.  I would also say practice filling it to make sure you have enough space. 

Decorate the front of the stockings with whatever adorable felt pictures your imagination can come up with....or in the case of Daddy's stocking (and you are tired and just want to get it done), a Christmas tree and dots.  Embroider a name at the top, embellish with sequins, buttons, ric rac etc...whip stitch the front and back sides together and call them done.

homemade felt ornaments
Back in the days before I had any money to buy Christmas decor at half price, I made my own ornaments, again with felt. The Mister and I have been married a significant amount of time, but I still enjoy putting our first Christmas ornaments up on the tree each year.


The mittens are just two pieces of felt, blanket stitched together, with a piece of faux fur glued to the top.  You really could just use a single piece of felt and sew the blanket stitch around the edge for aesthetic reasons.

The stocking ornaments have ric rac sewn decoratively down the front.  Easy and cute. I sewed the front and back pieces together using the sewing machine.  If you don't want to stitch the ric rac on, a hot glue gun is your best friend.

Beaded Christmas Spiders
Eventually you graduate from felt and move on to beads.  These are our Christmas spiders.  There's a lovely story behind them: They say an impoverished family had nothing to decorate their tree with one Christmas, and so a family of spiders spent the entire night, Christmas Eve, weaving and spinning their webs all over it to make it beautiful.  Santa came in and knew how hard the spiders had worked, but that the people might not see the beauty of a tree covered in spiders web, so he touched the web and it turned into tinsel.

Everyone, please have a Merry Christmas this year and if you don't celebrate Christmas, please have a wonderful holiday season.  And get out the glue gun and your pile of felt and see what you can come up with.

Happy Crafting!


Tuesday, December 2, 2014

All because I learned how to knit...Merry Christmas

Look, if I am taking the time to teach myself something new and crafty, you better believe I am going to show it the heck off to everybody I know.  And that means give it to everybody I know.  Merry Christmas, have some fingerless gloves.  Love, Heather


What's that, Dad, you don't think you'll wear fingerless gloves?  Aw, give them a try.  You might like them.

I'm sorry dear, I didn't hear you correctly, did you say there's no way in H-E-Double Hockey Sticks that you're going to wear a pair of fingerless gloves to work, that the fellas will MOCK you?  Don't worry about that, I made them all a pair as well.  Wish them a merry Christmas for me, will you?

 Girly, Brother?  You think these gloves are girly?  Haven't you heard the term metrosexual?
 
Thanks Grandma, I love you, too.  sniff sniff.  I'm glad you think the gloves will help with your arthritis.  Oh, and tell Grandpa not to wear his shoveling snow, they're not water proof.

Maybe they're not for everybody, I dunno.  But, I am making a bundle of them and love them more each time.  This may be because every time I make them I get just a teensy bit better at knitting.  The first few I made....let's just say they are a bit questionable.  That's why the teal ones are mine.

The thing I like about this pattern, is using the beige yarn for the main body of the gloves and the lighter gauge, gray yarn for the frilly top and for the bow, it gives it a sort of antique-y look that I really like.  And then I get to have fun with the cuffs.  Plus I love the combination of knit and crochet.  Knitting might never take the place of crochet for me, but I sure am glad to have the know-how.

This is the free pattern I used. Thanks, Creative Yarn.

Thanks for reading!

Heather

Monday, November 24, 2014

Pie so cool, you don't even know how cool it is

Thanksgiving is nigh.  In fact, I told my kids what we were going to be doing on Thanksgiving Eve, and they informed me that there's no such thing as Thanksgiving Eve.  I guess they know better than I do.  FYI, on the eve before we give thanks, my young and I will be making pecan pie, and so should you.

This is my slice of pie du jour.  The gourd pie may get all the glory, but this is the unsung hero, if you ask me.  Made correctly, pecan pie is a pleasantly sweet, caramelized fusion of velvety custard and lightly toasted pecans.  Made incorrectly, pecan pie can be a gelatinous, overly sweet mess.  Let's do it right, shall we?

There are a couple things you need to know before you make pecan pie.

-Watch for over-browning.   If you are moving past golden brown and delicious, but your pie is still too jiggly in the center, throw on a piece of foil to keep it from browning further. Once the pie filling is no longer liquid, and the crust is nicely brown, throw on the foil.  I usually do this with about 25 to 30 minutes left of cooking time.

-Take the pie out of the oven before it is completely firm.  You want the tiniest bit of give in the middle, but no wiggle on the sides.  Got it.  Because it's all about the bass, 'bout the bass no treble...Darn, catchy song.

-Do not pre-toast your pecans.  I have made many pecan pies in my time and have tried a lot of different methods.  If you toast them and then bake them in the pie, in my opinion, you end up with dry nuts.  Ew.


Pecan Pie
1- 9" pie crust, unbaked (I use store bought.  Shhhhh don't tell)
6 Tbl. Butter
1 Cup corn syrup (I use light because it's what I have on hand and it tastes great, so why mess with anything else?)
3/4 C. Sugar
3 eggs, whisked
2 tsp. Vanilla
1/2 tsp. Kosher salt
2 Cups, chopped pecans

Heat oven to 350 F. Place a cookie sheet in to get hot.  You are going to put the pie on the cookie sheet as it cooks just in case any filling bubbles over.  You don't want that in the bottom of your oven.

Put your pecans in the uncooked pie crust.

In saucepan heat butter, corn syrup and sugar over medium-low until the butter is melted

In another bowl, combine your whisked eggs, vanilla and Kosher Salt.  Here's the slightly tricky part.  You are going to add your melted butter mixture to your egg mixture, but you do not want to cook your eggs, so make sure the melted butter isn't at all hot when you're pouring it into the eggs, whisk constantly.

Pour your filling over the pecans in the pie crust.

Bake for between 60 to 80 minutes (I know that's a big time difference, you just have to watch your pie carefully.  I cooked mine for about 67 and it was pretty perfect), in the center of the oven until (like I said above), the pie is nicely golden and just a bit soft in the middle.  Let it cool completely (I am cooking it the night before which is perfect if you don't have a lot of time on the day of the feast).  Probably better would be to cook it same day, just make sure you give yourself plenty of time to bake it and let it cool for at least 2 hours before eating.


Serve with a dollop of lightly sweetened whipped cream and you will be the hero of the day.  The pie is quite sweet, so take it easy when you're adding the sugar to your homemade whipped cream. 

Thanks for reading and Happy Thanksgiving!

Heather

Monday, November 17, 2014

Because it's cold outside...Pantry Hot Chocolate


I frequently run out of prepared hot chocolate mix.  This is primarily because my children and their friends love hot chocolate.  After an afternoon of running and playing in the snow, there's nothing better than coming in to a warm mug of cocoa.  And of course, my kids usually have the whole neighborhood with them, everyone needing a mug of cocoa, so I have to be on the lookout for how to make it from scratch just in case the worst should occur.  No hot chocolate?  NOOOOOO!  Luckily I always have the following ingredients in my pantry for just such an emergency.


 Everybody line up for the good stuff


 Homemade Hot Chocolate
4 Cups Water
3 1/2 Cups Milk
1/2 C. Unsweetened Cocoa
1-14 oz Sweetened Condensed Milk
1 tsp. Vanilla
1/4 tsp. Kosher Salt
Flavored syrup of your choice, to taste (I used 2 Tbl. coconut syrup and it was sooo good)

Combine all ingredients in heavy bottom pan.
Cook over medium heat until everything has dissolved, stirring constantly.
Bring up to heat; but be careful as it gets very hot very fast and you don't want to burn little mouths.
***Make sure to scrape the bottom very carefully as cocoa can get stuck in the edges of the pan and may burn.
Serve with marshmallows.

Now time to wash all the mugs.

Thanks for reading!

Heather

Monday, November 10, 2014

Awwoooo, werewolves of...Salt Lake?

I think I officially have a tween now.  Oh, heaven help me.  My Oldest is turning nine which is a hop skip and a jump away from the days when I am despised and scorned by my own flesh and blood.  Luckily we're still in the days where I am loved and for the most part listened to.  If I think back to when I was a teenager....nope, don't even want to fathom it.  My girls are going to be soooo much better than I was....echo....echo....echo....

I am also still in the days when my children ask me to make them things for their birthdays.  Love it.  Can I always make my babies crocheted dollies and have them like them?  I suppose this day may come to an end and I will have to make amigurumies for complete strangers and hand them out on the street, and like it.

My Oldest asked me for a wolf, this year.  A wolf, right, I can totally come up with a great wolf pattern all on my own.  I mean, I did whip up a African Guinea Fowl for her presentation on animals who live camouflaged. But, turns out, nope.  I couldn't.  Luckily I found The Craftery Cattery, and she has a free wolf pattern that is righteous!  When was the last time you used the word righteous in this context?  I'm bringing it back.

Her pattern is well written, easy to read and results in the cutest little ankle biter.

And its adorably long snout.  My, Grandmother, what a big nose you have.
 
This was a very quick to make and I know my daughter will love it.  If you have any experience with crochet, making amis is fun and easy, all you need is some yarn, fluff and eyeballs and you are on your way. 

Thanks for reading!

Heather


Other amis I've made
Girl TMNT ami Girl Ninja Turtle Amigurumi

Lizacorn, yeah, you heard me
Mister's Mini Me


The day my daughter crocheted herself a rattail

April, inspired by TMNT

Monday, November 3, 2014

The Yummiest, No-Fail Corn Bread for a crowd

My Youngest asked me if I will make her corn bread instead of cake for her birthday, next year.  That's how good, and how much she likes this corn bread recipe.  It's super low-fuss and I have modified it from the recipe on the Quaker cornmeal package, just a touch.

I like to make a heaping amount of corn bread and use a 13 X 9 inch pan.  For the obvious reason of my ravenous corn bread eating young and husband.  I have been known, on days when we are having left-over soup and have run out of corn bread, to whip up a second batch because it is loved that much in my household. 

So light and moist (dry corn bread=ew) and it works out EVERY TIME.  No fuss, no fancy stuff, just good, simple corn bread.

Corn Bread
3 1/2 C. Flour
1 1/2 C. Corn Meal
1/2 C. Sugar
4 tsp. baking powder
1 tsp. Kosher Salt
2 C. 2% Milk
1/2 C. Canola Oil
2 eggs, whisked

Heat oven to 375 F.
Using butter, grease a 13 x 9 inch glass casserole dish.
Combine flour, corn meal, sugar, baking powder and salt in medium bowl.
Combine milk, oil and beaten eggs together and add to dry ingredients.  Mix until the wet and dry ingredients just come together.
Pour batter into greased dish.
Bake for approximately 25 to 30 minutes until the top is lightly gbd (that's golden brown and delicious) and a wooden skewer, when inserted in the middle comes out clean.
Serve while warm with a generous slathering of creamy butter and sweet honey.


Serving suggestions that go perfectly with corn bread:


easy chili
Easy Chilli

2014 Halloween Showcase

owl face paint
We don't do masks, we do face painting here.  My Oldest was Hermione/an animal witch, so she got a cute little owl on her forehead.  She actually gave me free-reign to paint whatever I wanted, as long as it was an animal. 

snow witch face paint
My baby was a snow witch.  I think this is partly because she wanted to be Elsa and a witch and so we met in the middle.

My little witchlings trying to keep their hats on in the wind. 

Thanks for reading!!

Heather
Related Posts Plugin for WordPress, Blogger...