Thursday, January 5, 2012

Crisco???? And Swoon!!!

Have you read The Help?


It is my favorite book of the year!  The movie, is good, if you read the book.  If you haven't read it, please do so.  But, here is a line about Crisco from The Help that I think is classic.  Take it away Minnie...

“Ain’t just for frying. You ever get a sticky something stuck in your hair, like gum? That’s right, Crisco. Spread this on a baby’s bottom, you won’t even know what diaper rash is. Shoot, I seen ladies rub it under they eyes and on they husband’s scaly feet. And after all that it will still fry your chicken.”)

Plus Crisco now comes in these convenient 1 c. sticks.  It's so easy to use!!!  No longer do you have to dig through the giant tub...I also have the giant tub, but these sticks are great!!

So, the question of the day is...do you use Crisco? It's not what the cool kids do, that's for sure. Butter is definitely the cool option.  But guess what, sometimes good old Crisco is just the ticket.  I use it...for about 3 things.  And for these 3 things, I like to keep Crisco on hand. 

1-  For my favorite chocolate chip cookies. Yum...by the way I'm going to include the recipe here in a minute.
2-  For my favorite No Chill Most Delicioius Sugar Cookies.  Yum.   Check out the link if you need the perfect sugar cookie recipe that is easy and delicious every time.
3-  When I need to grease a pan for a cake or bread or anything.

So, here's the Ultimate Chocolate Chip Cookie recipe straight from...yup...the Crisco recipe book...adapted by...me and my mom.  I think in her attempt to make these cookies healthier...remember this is the late 80's and 90's we're talking about, she wanted to cut the fat.  Luckily she was ahead of the times and wanted to cut the sugar too!  So that's where the adaptions to this recipe come.  This will make a denser, loftier cookie, it won't spread out as much.  It'll keep a little bit of poof to it.

My sister in law swears by these cookies.  In fact, these turned her into a Crisco devotee...for this one recipe at any rate.  She never had Crisco in her house until the momentous day when these came into her life. So there you have it.  These cookies are life changing.  She does use the original recipe, not the "healthier" version my Mom and I use, but that's just fine.


Ultimate Chocolate chip Cookie
1 C. Butter Crisco
2 C. packed brown sugar
4 Tbl. Milk
2 Tbl. Vanilla (I will tell you the truth that I am a little perplexed by the large amount of vanilla called for...but I just go for it.  If it ain't broke...you know...)
2 eggs
3 1/2 C. Flour
1 tsp salt
1 1/2 tsp Baking Soda
1 package chocolate chips ( I use Guitard milk chocolate myself)
2 C. Walnuts (optional, but necessary if you ask me)

Heat oven to 375
Combine Crisco, sugar, milk and vanilla in stand mixer, using paddle attachment.  Beat until creamy.
Add eggs to creamed mixture.  Mix until combined.
In another bowl, combine flour, salt and soda.  Stir until combined.
Add flour mixture to creamed mixture and beat until just blended.
Add chips and nuts and mix until combined.
Drop by large spoonful onto an ungreased cookie sheet (I use a parchment paper-lined cookie sheet)
Bake for 8-10 minutes (I usually have to go 10 because I like my cookies more done maybe).  Cookies will appear moist. 
Cool and then devour with glass of milk.


Now for my latest Swoon block by Camille Roskelley

I think this is my favorite on so far. Something about the black and the kaleidoscope affect the pattern on the fabric already has...Love!!

Heather...Crisco devotee herself!!

Tuesday, January 3, 2012

My daughter's @#$%& Teeth and a lovely quilt for 2012

Fact.  Redheads experience greater pain sensation than non-redheads.
Fact.  Redheads require more anesthesia than non-redheads.
Fact.  Redheads experience more anxiety when going to the dentist than non-redheads.

Question...why do I have 1 husband and 2 daughters who are redheads? 
Answer...because they're the best!!!  Except for the teeth-anxiety-greater pain sensation thing.

I feel a duty to all parents of redheads to post a tutorial on:

HOW TO PULL THE @#$%& TEETH OF A REDHEAD  
I have now pulled 4 of them...and nobody gave me any instructions.  This tutorial will probably also work for non-redheads, but I wouldn't know. 

The first 3 pullings were terrible.  This last pulling, started out terrible, I threatened to throw away Every. Single. Toy. Santa just brought her...not my loveliest moment I am sure.  Which she readily agreed to as long as I didn't pull her tooth!  According to the dentist, leaving a loose tooth in for too long can actually damage the tissue around it.  So it is not wise to let it just loosen and loosen more and more until it's dangling from a single thread...which we did for the last tooth.  Ahem.  Okay, lesson learned.

Step 1.  Prepare for the hyperventilating, weeping and waling, thrashing and clenching of jaws by mediating for approximately 3 hours before attempting the pulling of the tooth.  If you do not do this....there will be serious consequences.  As the puller you will resort to threatening violence and cruel punishments just to get the child to HOLD STILL and OPEN THEIR DATGUM MOUTH!!!! 

Step 2.  Have a couple of Kleenex handy.  This is the only tool you will need for the pulling of the tooth  That and a strong grip and much love for the child.

Step 3.  Have the child sit next to you.  If you are right-handed, have them sit on your left side for better leverage.  Vice Versa if you are left-handed.

Step 4.  Somehow get a firm grip on said tooth using the tissue.  It helps to make sure the tooth is not slimy and wet by drying it off first with one of the tissues.  This may require much reassuring that you promise you will not pull it!!!!!  And that you promise it will not hurt!!!!

Step 5.  Try and hook your right thumbnail as much as you can, under the tooth along the gums.  Don't pull and don't force it under (blech)!!!  Just get a nice grip that isn't slipping.

Step 6..  Have the child lean into you for a snuggle.  Ask them to rest their head on your shoulder all the while DO NOT LET GO OF THE @#$%& TOOTH FOR ANYTHING. 

Step 7.  As the child comes in for a snuggle, put your left arm around them and ever so slightly put a little pressure on the blasted tooth.  You will feel it give just a bit (gross, I know).  Resist the urge to pull hard which will only result in startling the child. I feel that them moving in for a snuggle and you moving your arm around them distracts them enough that you can put a wee bit of pressure without them actually know it.  Continue giving it the slightest pressure until it will POP out and the child won't even know it.  Zero pain...and for you zero aneurysm.  It's a win win.

Here is my latest block from  Swoon by Camille Roskelley  This was a tricky fabric to use as the fabric pattern had a lot of color variation over a large space.  So, where the middle has the purple and orange and turquoise a lot of the other pieces are more yellow...but I still love it.  Especially with the navy polka dots.  I think it anchors it. 

More Swoon to come!


Heather...mother and tooth puller extraordinaire!

Tuesday, December 27, 2011

Now what?

Do you feel like this once Christmas is over?  There's all this build up for this couple of days and now...I almost don't know what to do with myself. 

You mean I don't have to make a million pillowcases?  I don't have to cook and cook and cook all kinds of decadent, butter-laden delights?  I don't have to scour the Internet for any last minute deals that my kids might pine for?  So...now what?

Here's a recap of my holiday weekend...

My own personal angel.  I like the "halo" that is above her head.  My favorite part of the reenactment of the Birth of Jesus was my Youngest wearing her angel garb and just singing to her own tune while everything else was going on.  We had Herod killing all the boy babies and she was just a singing "Yay Christmas Eve.  Yay Christmas, Christmas, Christmas.  Christmas is good."  And the like. 

Another highlight...my nephews performance of Rudolph kills Santa...oh so classically BOY!

I need to catch up on my Heaven Pie.  here it is in all it's glory.  Topped with freshly whipped cream and ready to be enjoyed.  Rich, rich, rich!!!  Just a small piece will do ya.

The Fam on the Merry morning.

My Mom is a tease.  She realized after having purchased all the Christmas presents for her children that she overbought...FOR ME!!!  So a cookbook I would have dearly loved
Became her present, instead of mine...uhhhh...ex-squeeze me?  I did use it though and made French Onion Soup for dinner on Christmas.  Can I just say YUM!!  But, can I also say...LOTS OF WORK!!!

The amount of time it takes to properly caramelize the onions is 2 hours or so.  Then you have another hour where you are stirring, stirring, stirring and deglazing.  But, if you have the time, definitely make this soup.  Very good!  Oh, and have somebody else chop the onions.  Envision me with tears streaming down my cheeks and Christmas Eve night's mascara running while I attempt to chop 8 onions.  There were big time tears.  Everybody in the house complained and complained about the strong onion smell..that is until they sat in the oven for 2 hours.  Then the complaining stopped pretty darn quick.

Let me just give a quick review of this cook book.  It is amazing.  I love that for each recipe they explain why it works.  Why they did what they did to make it better than all the others.  They also give fun tips like...when cutting onions the only thing they found worked was wearing contact lenses or swimming goggles...right then.  I can just envision me wearing goggles while chopping onions.  not going to happen.  They also give funny behind the scenes tidbits like when Christopher Kimball does a tasting each episode, he actually films an entire day of taste tests starting at 8 am and going until late afternoon.  2 taste tests per hour!!!  His worst day included: coffee, hot sauce, vanilla extract and mail-order filet mignon.  Fun info! 

I also like the way the book is organized.  For example, they don't just lump beef all together.  They give you a section on roasts and a section on one pot dishes and a section on steak.  So you really can just be thinking that you want to make a roast and you can decide beef or pork based on their recipes.  Even though I only had the chance to make one recipe out of this book, I have made several America's Test Kitchen recipes and I am a huge fan.  This book includes every recipe from 2001 to now.  I highly recommend it!

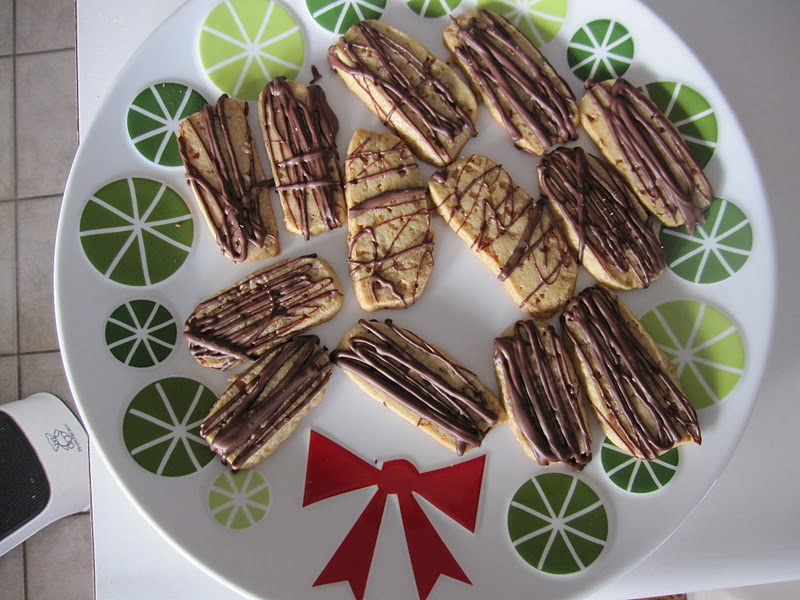
Speaking of America's Test Kitchen.  These are my all-time favorite cookie.  Chocolate Toffee Butter Cookies.  I make them semi-regularly, and wish I had a batch of frozen dough in my freezer all the time!  They are easy, simple, but oh so good.  They are subtly delicious.  You don't take a bite and pass out from the goodness on the spot...you take a bite and think...nice cookie...then you find yourself eating another bite and then another until you've polished off about 6 cookies in no time flat.  And still want more.

They are also the best dunking cookie I've ever had.  Hot chocolate, Coffee...Orange juice maybe if you're Mr. Because I Can.  So good!

Chocolate Toffee Butter Cookie
Adapted from America's Test Kitchen

2 1/3 C Flour
1/2 tsp baking powder
1/2 tsp salt
2 sticks butter, softened, but still cool...this means straight from the fridge and about 10 seconds in the microwave for me
1 C packed brown sugar
1 egg
1 tsp vanilla
1 C. Heath Toffee Bits...they recommend without chocolate, but let me say I love them both ways.  If I have the toffee bits with chocolate, I just don't drizzle chocolate on at the end.  If I have the plain toffee bits, I do like little chocolate razzle dazzle at the end.  Both are good!
1/2 C. chocolate snaps (these are disks of chocolate that do not need to be tempered.  Similar to almond bark, but I like Callebaut brand, no surprise there)

Adjust oven racks to upper middle and lower middle positions.

Heat oven to 350

Combine flour, baking powder and salt in bowl. Set aside

In mixer with paddle attachment, beat butter and brown sugar on medium speed for approximately 3 minutes until fluffy.  Add egg and vanilla and beat until combined.

Reduce speed to low and add flour combo in two additions.  Mix until just combined.

Add toffee bits.  Mix until combined.

Divide dough in two.  Roll each piece into a log that's approximately 9 inches long.  Then smoosh

Line two baking sheets with parchment.

Using a chef's knife, cut dough into 1/4 inch cookies.  They will look quite thin.

Place on cookie sheets.  They don't spread too much due to the chilling, I can usually get around 21 cookies per cookie sheet.  So 3 across and 7 down.

Bake 10-12 minutes until the edges are just lightly browned...make sure you rotate your cookie sheets half way through the baking.

Cook completely on baking sheet.

Once cool, melt your chocolate in a micro-wave proof bowl, I use my Pyrex measuring cups, about 30 seconds at a time until melted.  Drizzle to your heart's content.

YUM!  Really, I don't put a recipe in this blog unless it is stellar.  Make this and find your cookie true love.


Heather

Saturday, December 24, 2011

Pie in the Sky

I mentioned this pie briefly at Thanksgiving.  Let me just say this pie has taken on legend status.  We think about it.  Dream about it.  While eating our oatmeal in the morning, pine about it.  It is quite possibly the best pie known to man.  I'm just saying.

I am going to give you the link for the pie crust tutorial from The Pioneer Woman's Pie Tutorial. Which, let me just say is a life saver. I come from a legacy of fine pie makers...well, one anyway. My Grandma Evelyn is known for making pies and I have the fondest memories of eating pie all year long at my Grandma's house. Whether it was fresh raspberry pie in the summer or Homemade Apple Sauce Pie in the winter, it was ALWAYS pie. And I have failed for so long when it comes to making pie crust. And I was desperate to make a good crust! I have almost achieved that. My crusts still aren't beautiful, but they are tasty! So, I am almost there! Use this tutorial. I find that I want to use a little less salt than she calls for, but that might just be a personal preference.  I also don't use the fancy lard she calls for...but I do use lard and butter. I found my lard in the Latino aisle...after quite an extensive search.


So since my In-Laws did not get to experience the heaven known as Heaven Pie around these parts, I figured it was my duty as a dutiful daughter-in-law to make it for them for Christmas Eve.  Hence the two pie marathon I am involved in today.  It's actually not so bad.  I made the crust and ganache last night.  It is important to blind bake your pie crust.  Here are the instructions for blind baking:

Blind Baking Pie Crust
Heat oven to 425.
Place your pie crust in the pie plate, I use and love the Pyrex pie plates.  Crimp the edges if you're fancy.
Place parchment paper over the crust and fill it with pie weights, or be like me and use uncooked beans.  This will keep your crust flat and smooth during baking.  Bake for 15-18 minutes until the edges are lightly browned. 
Reduce oven temp. to 375.
Remove the parchment and beans from crust and place back in oven until golden brown all over.  This took me approximately 10 minutes.
Cool.
Done.

The picture above is with drippy, hot ganache.  I reduced the amount of ganache that I made from last time.  I followed Martha's recipe and it made a TON of ganache.  I didn't want the waste.  I figured from last time the amount I made would have coated 3 pies.  As I was making 2 pies, I reduced the proportions by 1/3.  Here it is as follows...

Ganache Recipe adapted from Martha Stewart Living Enough to coat 2 pies
5.5 oz coarsely chopped dark chocolate (use the good stuff...and don't make the same mistake I did and coarsely chop the chocolate too coarse.  It needs to be fine enough to melt)
2/3 C. Heavy Cream
Pinch of Salt

Have your chocolate chopped and ready and waiting in a nearby bowl with the salt in it. 
Bring your cream JUST to a boil. 
Pour the hot cream over the waiting chocolate.  Let it sit without touching it for 10 minutes.  If you decide to stir early, it can cause your ganache to go grainy.
Whisk the cream and chocolate until smooth and shiny.  This will emulsify the cream and chocolate and complete your ganache.

Pour the ganache into the cooled pie crust and twist the pie plate around and around until the ganache has evenly coated the pie along the bottom and up the sides.  Swirl until the chocolate has begun to settle a bit and won't all pool in the bottom once you stop the swirling.


Chocolate coated pie after spending a night in the fridge.  

Now for the pudding part...

Remember the 7 P's when it comes to this pie.  It is very important.  Proper Prior Preparation Prevents Piss Poor Performance.  It is very necessary to have your chocolate chopped and ready to go.  Have your vanilla sitting there waiting for you and have the necessary tools that you are going to need.  Today instead of using all Caullebaut Dark Chocolate, I used 1/4 Callebaut milk chocolate to make it a little more kid friendly.  My Youngest not only licked her spoon clean, but when she saw Daddy and his taste of pudding, decided she would trade him her spoon for his.  He feels he got the short end of the stick on that deal.

I mostly used Smitten Kitchen's Best Chocolate Pudding recipe.  But as she does, I mixed it up a little bit.  So here is my recipe and step by step instructions.  The real reason I am posting about this pie again, is my Mother wanted to make this very pie for her co-workers. She followed Smitten Kitchen's instructions to the letter and her pie ended up watery as the pudding never set up.  Here's the thing about making home-made pudding or custard.  It takes a LONG time!!!  So be ready.  She used a double boiler as the recipe calls for.  Don't use a double boiler.  Just be prepared to stir non-stop for the entire time!

Make sure you have the appropriate tools.  You need a rubber scraper and a whisk.  And have the chopped chocolate and vanilla sitting close by as when you're ready to use them you need them handy!

Homemade Chocolate Pudding
changed a bit from Smitten Kitchen
Serves 6 in pudding form and fills 1 pie shell if you're making pie...so if you're making 2 pies, double this

1/4 cup cornstarch
1/2 cup sugar
1/8 tsp salt
3 cups whole milk ( this is important.  Do not skimp and use 1% instead)
6 ounces dark chocolate, coarsely chopped.  (Use the good stuff.  I like Callebaut
1 teaspoon pure vanilla extract

1.  Put the cornstarch, sugar and salt in a heavy bottom sauce pan.  Stir to combine.  Add the milk slowly, whisking all the while to prevent lumps.  Turn your heat to medium.  3/4 of the time I use the rubber scraper and 1/4 of the time I whisk.  I make sure to scrape all over the bottom of the pan as well as along the sides and make sure you get the crease where the sides meet the bottom of the pan with your rubber scraper. 

The thing is, you don't want your pudding to scorch!  This will happen if  the pudding sits for too long without having been stirred and will ruin your pudding. Once the pudding heats up a bit, but WAAAYY before it boils, turn your heat to low/medium low.  I am too impatient to continuously cook it on low.  It really would take forever.  But because I am cooking it faster, I have to be extra vigilant that it doesn't scorch.  So I will use the rubber scraper for about 3 minutes or so and then for 1 minute I will whisk whisk whisk.  I do this for the entire time.

You are looking for the pudding to thicken into a nice thick consistency that will coat the back of your spoon.  This is a tricky thing to figure out.  Here it is not thick enough.  The pudding was beginning to seep back over the line I made.  You want it to hold the shape you make in the pudding.  You will actually be able to feel when the pudding begins to thicken.  As you stir, it will feel different.  At this point BE EXTRA CAREFUL!!!  and make sure you scrape everywhere all the time!

Here's the pudding at the point I felt it was ready.  I hope you can see the difference, but it was thick, held it's shape and really did not seep into the line I made.

2.  Add the chocolate!  Dump the chocolate in and whisk until combined.


3.  Remove the pudding from the stove and add the vanilla.  Whisk like crazy again.  Once you put the vanilla in, the pudding will look like it's going to separate for a minute, but after you've stirred it in, it will be perfect and thick and delicious! 

Like this!!!  See how thick it is.  It completely coats that rubber scraper and isn't going anywhere!!!

Again, I am the impatient sort, so to help my pudding cool faster, I put it in the fridge.  I make sure to whisk it every couple of minutes as it cools.  I do not want it to form a skin on the top.  GROSS!  The reason I want to cool it, is I don't want it to melt the ganache on the crust. 

Once mostly cool, pour into your pie. 

Smooth out the tops.

Then put in the fridge to cool...

Ooops...

Make extra sure that you press plastic wrap directly on the top of the pudding.  This will prevent a nasty skin from forming and keep your pudding smooth and creamy.

3.  Refrigerate for at least 30 minutes.

4.  Which hasn't happened in my house yet.  Whip some cream, top the pies completely with it and devour in 3 bites.

YUM!


I wanted to show you the bottom of my pan so you can know what it should look like.  As you can see there is nothing that has cooked onto the bottom of the pan.  It is clean of any scorched pudding.  This is due to diligent scraping and whisking.  After having everything prepped and ready to go, this is the most important step.

Now, go out there and make this pie!


Heather

Thursday, December 8, 2011

My husband can go no further than this Title. Thanks and love ya!

****I have updated this post just a bit.  So if you'd like, Click Here to be transported to the year 2013 ***

Just thought I'd start this post with a put him off the track picture...are you looking Mister? I hope not...by the way this is a tasty little creation of mine using chocolate ganache and chocolate pudding. Top it with homemade whipped cream and some chocolate shavings and you've got pure heavenly goodness. Make this.  I used Callebaut dark chocolate as my chocolate involved in the ganache and pudding and it was rich and awesome!  I also weighed my ingredients when necessary. Go get a scale, you'll be happy you did when all your recipes turn out amazing.

Sometimes I'm ambitious...maybe a little too ambitious some might say.  But, look I figure if I want to make a pillow case with a picture of a Volkswagen Camper Bus on it, circa 1970's...then by golly I should be able to do it!  Commence the very difficult project...

I had to scour the Internet for pictures of a VW Bus...because I'm not schooled in this lovely mode of transportation.  We only had 3 kids, we got to pile 3 deep in the back of the Lincoln Continental...seat belts optional. 

There are lots of pictures and of course I figure I can make my own paper-pieced block from my own brain cells.  I've done plenty of paper piecing.  I'm smart enough...good enough...etc etc etc...well...I am...I think.

This started out much more complex.  I figured I could do a slightly off center full-body view of a VW Bus...HAHAHA.  No.  You can't!  Don't try it! Unless you do try it and it works...please let me know if this is the case.

Look, you have to be able to keep everything perfectly centered and so you can't just put a piece wherever you want and hope it'll match up correctly.  There are seams involved! 

Just a fun little fact...the windows on this VW Bus are from one of my husband's shirts.  He thinks I'm a loon because I like to keep fabric from shirts of maybe torn sheets or whatever and save them for future projects.  I like to think I'm frugal...he thinks I'm crazy!  So it was a bit of fun revenge to use one of my scavenged treasures in his pillow.

Really I had to think and rethink how I was going to pull this off at several points during construction.

Because I'd get to sewing what I was sure would work....and then come to realize that I just made it have weird wings at the top...rethink time.

One of the trickiest things about paper piecing is sometimes you just have to take a leap of faith and hope you are positioning your fabric correctly...because you are going to fold it over to the right side and sometimes angles are not so friendly!

I confess, I wasted more than my share of fabric on this project...but I was in a bit of a hurry and didn't know exactly what I was doing...I felt a little overlap was what i need to make sure everything ended up the way I wanted it.

Then I got to this point and realized I had to figure out a way to get the wheels on...hmmmm...won't exactly work with the current block, so luckily I had an epiphany and made 3..ish separate pieces to be sewn together at the end!  AHA!  Turns out it actually is part of paper piecing to sew multiple blocks and then stitch them all together at the end.  Now I know. At the time, thought I was a freaking genius!

Oh yeah, got me some wheels.  Of course things didn't exactly work out with these wheels the first time as I miscalculated and cut one of them off completely...right then....re-figure time. 

My seam ripper and I were besties again for this project.  So...the wheels are a little wonky.  But, by this time...the pile of wasted fabric and unpicked thread had piled up and I was a little crazed...so I figured wonky was the way I wanted it from the start...right?  Right.

Add the extra bits to be later finger-turn appliqued into place...and I was starting to feel really good about things.  The wings were gone...there were wheels, a bumper, the W on the front...HURRAY!!!

Finished product and DAMN if I don't love it!  I put a piece of paper over the personalized license plate...I know, I know...but just in case.  So you can embroider whatever you want on the licence plate to personalize it.  I love the Denyse Schmidt fabric I used to complete the pillow case.  What turned out to be an impulse buy I once regretted has now made me so happy!  I have made 3 things now using it and I love them all!

Here's the back.  I always like looking at the backs of blocks.  It's just fun.  Yeah...there are paper scraps still attached.  I was exhausted by this time.  And picking off every last piece of paper was not happening.

All done and it's love!  This might not be the side my loving husband ever sleeps on, as it's not exactly smooth, but that's okay.  I love it too much and am pretty sure he will too!

Thanks for sticking with me through the play by play. 

Shared here:
Visit thecsiproject.com

Heather

Wednesday, November 16, 2011

Posh Pillowcases FYI

Wow...a rare couple of hours all to myself?!?  The kidlettes are off playing at a friends...my work for the day is done...the house isn't a complete disaster zone...SEW TIME!

My latest "posh" pillowcases.  I LOVE these ones.  I think the fabric on these is so old fashioned.  It reminds me of my beloved Grandma...(or Grandmother as she would prefer we call her...she would also prefer that I wear lipstick...I wear moisturizer??  Does that count?  And no, it doesn't, I know that)... and probably somewhere in the back of my memories it reminds me of my Grandma's Mom.  I have seen some fabric that my Great Grandma had and I am pretty sure these would be right up her alley.


I wasn't sure when I bought this fabric how much I'd like it.  I didn't really have a purpose in mind for it, it was just the fabric of the moment.  Everybody went wild when Denyse Schmidt designed a line for Joann's...so I felt I had to jump on the bandwagon...and then later regretted paying full price for this fabric.  See, the thing is I didn't even know who Denyse Schmidt was...still don't.  Apparently she is a fancy lass in the fabric business.  But now, I feel like it was the right choice as I used this line for the binding on my Oldest's Wizard of Oz Quilt and now for these pillowcases.  Totally worth full price.  I think.


The back side.  Cute yellow dahlias.  But, I've gotta say I just love the front the most.  Something about how vintage it looks just speaks to me in a pillowcase.

The pocket...of course I was going to show you the pocket.   And now that I have put my current pillowcases on mine and Mr. Because I Can's pillows, his pillow is in the pocket too! 

AHA!  That's right, I'll show him a little class and refinement...he might just like it...or he might go back to his corn dog ways.  We'll see.

I would like to make a special note in here regarding the making of the Posh pillowcases.  In my previous post I mentioned that you really need to be aware of your fabric images and if it needs to face a certain direction and if you just follow the instructions blindly, it will quite possibly be facing the wrong direction when you put them on your bed.  I also realized that you need to know which direction is "out" for your pillows.  If I was going to make an individualized one for myself that had direction specific fabric, the opening of my pillowcase faces to the left.  Mr. Because I Can's faces to the right.  So, this can be a problem and you will have upside down fabric if you don't pay attention.  So, really really be aware of the direction of your fabric images and the direction that you want your posh pillowcase to lay.  PAY ATTENTION PEOPLE!!    I cannot say this enough.  This is because more often than not, I am not paying attention, so I really really really need to focus on this myself.

There you have it.  Go make some posh pillowcases you will LOVE them!


Heather

Related Posts Plugin for WordPress, Blogger...