Monday, October 3, 2011

The Beginning

An arm. 

With an eye post sticking out of the shoulder (that's to attach it to the body...when there is a body).  I tried to weasel my way out of making my sister a ami for her sis in law's new baby.  But, what did my sister go and do...Tell her that her beloved sister who this sis in law has actually met, was making her an extra special something...right then.  Begin to crochet.  I cannot let this woman down.  I mean, I have met her.  I have babysat her actual  young and now she has expectations of me....I will make her latest addition a sweet something. 

I may have tried to convince my sister to let me just give her one of my darling daughters' pigs...you know, the ones that don't have appendages...she wasn't going for it.  Fine!

In case you weren't aware...Halloween is coming.  I love Halloween.  I love October, I love the spooky decor, I love making costumes and dressing my darlings up, I love decorating my house...not to the extreme, but just to the level of fun! 

These spooky candy hands are my favorite!  I always save my decorations from the year before...even if they are made with candy.  I just warn people, like my brother in law who tried to eat from one of my Christmas displays one year that the candy in the (most likely) lead-lined bowl was about 6 years old and it was probably best he not nibble it.

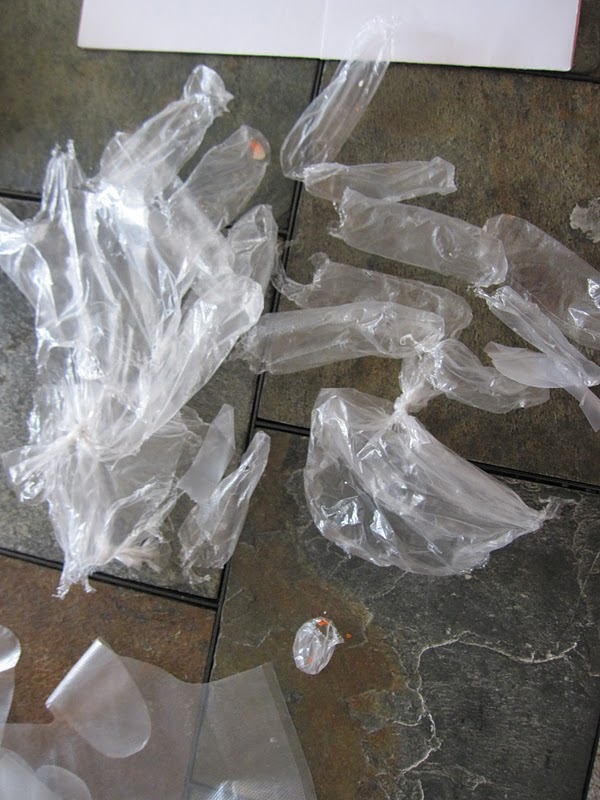
Be warned though...be careful in hanging these.  So, apparently I must have used industrial strength tape last year, because this year I dropped 4 hands  I think.

This is the result of that.  Luckily I kept the gloves that I use in my Halloween Decor box.  Handy.  So, here's the deal.  Do not be like me and in fact buy medical latex gloves.  They are not clear.  They are not what you want.  You in fact want food handlers clear plastic gloves.  I made the mistake of buying some gloves from Costco for this purpose.  Yes Costco.  So that means I had on hand approximately 10,000 yellowish latex gloves.  Right. 

Just start filling with your candy of choice.  Side note.  I in fact think Candy Corn are the most disgusting creation on the planet.  This does in fact include all candies that are made of whatever candy corn is made of.  You know, the nasty pumpkins .  Blech.  I do though think they are terribly cute.  So I like to decorate with them.  It's kind of like John Mayer.  I know he's a sleaze, but I kind of like his music and some of his antics.  So, it's a dilemma.  But, I suck it up and I decorate using candy corn and upon occasion I read John Mayer's blog.  Confession over.

It is important to make sure the candies fill the fingers.  They like to get stuck up in the palm of the glove. Just ease them down.

Tie with a knot as close to the candy as you can get.  Tying these gloves when they are so full can be tricky.  I've found that twisting the top as tight as I can and then tying the knot works best.

Tie a length of ribbon underneath the knot in the glove (make sure to secure it well, otherwise you will drop them and I guarantee the glove with rip).  And hang from your door or wherever you see fit.


The hutch in my front room.  I long to find some bugs or spiders that I can cover my roses with.  As of now the little buckets are just filled with white roses, but when I find them they will be crawling with spooky spiders!

As I have not completed my Ghastly wall hanging, I will use this cutie.  I love this little quilt except for one thing.  I used ultra heavy wonder under.  Bad choice.  The poor image is so stiff.  I long to re-make it.  Someday when I have loads of time.

You gotta love her sassy bustiers and brassieres and stylish shoes.

My pillow covers that just slip right around my red pillows.  For now it works for me.  Someday I will make actual proper pillow covers for Halloween.

Table Runner.  The funny thing about some of these things is, they are quite old.  And I made them before I had any skill really.  So, again, if I had the pattern still I might try and remake this and take my care in fussy cutting the images.  At the time I was only interested in getting something done FAST so I could see it.  Live and learn.

Paper plate skeleton.  Yes, even this I saved from last year.

Ghosts made from balloons and garbage bags.  This is my Youngest's.  She doesn't believe in anything spooky or ugly.  All she wants is beautiful princess ghosts.  So, this is what I came up with.

And finally covering every window with home-drawn Halloween images. 

I guess that pretty much covers how I am decorating this year for Halloween.  This weekend I'll add some pumpkins, but I didn't want to get them while they weather was still really warm.

So, having made this blog post, I've really discovered that my Halloween style is definitely homemade.  I obviously don't go for pre-manufactured items.  I either want to make them or I want my kids to make them.  I know having hand-drawn and colored pictures on your windows may not be the classiest, but it's sure the most fun!


Heather

Tuesday, September 20, 2011

Just call her stump

See what happens when you get a fire lit under you, miracles can happen.  My daughter's ami, that has been in the works for...a very long time is getting closer and closer to being done.  It doesn't hurt that my oldest has been haranguing me day and night to finish it.  "is it done yet?"  "mom, are you working on my rabbit?"  "mom, I can see that you are making dinner, cleaning the house and working on world peace...but are you done with my rabbit yet?"

I told her it'd be done by Saturday.  I think it's doable.  Cross fingers.

I decided to give this rabbit a twist by giving her some cute little knee socks.  I think it's going to be adorable.


I wanted to give you a working shot of what it means to work on a fairly involved crochet project like this...it means keeping track of multiple spots, and keeping them separated from each other.  To do this, I like these little crochet clips.  As you can see I am employing 3 at one time.  This is about the max that I use at any given time.  But as I am splitting the torso into two legs, I need to know my boundaries...otherwise you get one leg that's 1" round and another that 2" around vs two that are 1.5" round.  See, nobody wants one fat leg.

Here's another shot of the madness.  So two are keeping track of the leg I am not working on and the 3rd is keeping count of the rounds on the leg I am working on. 

When I am actively crocheting, I am doing it with the ami upside down.  Sometimes this is obnoxious because it feels like it gets in the way, but I guess if I tried to sew it rightside up, it would get quite heavy and flop over any way.   Oh yeah, and I am watching Dancing with the Stars in the background.  Go Maks and Hope!


I decided to give the rabbit rainbow panties...I think they're cute but they have wound up blending in with the flesh. So I am going to have to sew ruffles on or something to give it a little emphasis. I probably should have sewn a row of slip stitches, but as I am making this up partially on my own, I didn't think about it until I had sewn most of a leg...oh well.  I'll figure something out.

 Another Amigurumi book review:

Amigurumi World Seriously Cute Crochet by Ana Paula Rimoli

Okay, this book has many cute things in it, but they are in no way as detailed as "Amigurumi Super Happy Crochet Cute".  This book focuses on tiny critters that can be completed in a few hours.  So, a really good book if you want to bust out some cuties in not too much time.   And there are some seriously cute things in here.

This book was an awesome purchase for me....for this very reason.  She gives instructions on making cute little eggs.  My youngest loves "h-eggs".  I think she was at particularly influential times in her life her first and second  Easters.  She would walk around carrying plastic eggs wherever she went and loved looking at the eggs in the carton and wanted to (and still does) help crack the eggs.  So I was able to make these for her birthday and I cannot tell you how often I have seen her wandering around carrying an egg.  There was a time when she almost wouldn't put them down and wanted to sleep with them.  Due to eggs getting lost in the covers and her waking up distressed in the middle of the night that she couldn't find her h-egg and Mommy having to come in, tear the covers apart to find the eggs to restore calmness, we decided to banish eggs as lovies in bed.  But they are great toys.

Gotta love the chicks too!

Get crocheting friends, it's a great hobby.


Tuesday, September 13, 2011

@#$% Jam...nope...Butter?!?

Homemade peach butter.  What is it?  It sounds like you take a hunk of butter and mix some peaches in it and spread it on toast.  Sounds good if you ask me...but nope, it's basically jam.  You cook it for a long...let me repeat...LONG time so that it cooks out most of the liquid and it gets really thick and the flavor is really concentrated.  No pectin needed.

Thanks to Smitten Kitchen I had to try it.  I had wanted to make peach jam this season and this sounded fun.  I am all for trying new things.  So I got my box of peaches, yes I said box and set out to conquer this new canning delicacy.  I referred to her recipe as well as my Ball Blue Book guide to preserving canning recipe book...but that one ticks me off because it tells me not to use my steam canner...which then sends me into a tizzy that I am going to kill my family off with botulism...which then has my Mom reminding me that she has canned for upteen years using a steam canner, her mom used a steam canner and her mom's mom used a steam canner so simmer down now!  Deep breath.  Okay...secretly look up pressure canners on amazon.com and covet them and think about when I will have riches again and will buy one.  Ahem...


So, peach butter.  I doubled the recipe which turned into a fiasco because Smitten Kitchen said it takes ohhhhh....40 minutes max to simmer it down to the appropriate thickness.  Bull.  It took me almost 3 hours and that's just because I decided to give up getting the appropriate thickness and kept turning my temperature up hoping for a faster reduction.  As my pot's contents got lesser and lesser from it slowly being put in jars, the remaining product eventually got there....so some will be thicker than others.  Oh well.

Take 4 to 4.5 lbs of ripe peaches and 4 C. sugar and 1/2 C. water
Really, the easiest thing to do would be to check out Smitten Kitchen, I referenced her above and find her post on peach butter, but I'll give you the quick version here.

**********The thing you need to know about canning is...well there are three things that I feel are most important. ***********

1- READ THE INSTRUCTIONS COMPLETELY BEFORE YOU BEGIN.  I can't tell you how many times I have messed up a step because I think the sugar should go immediately in the fruit...it doesn't.  READ FIRST!

 2- The 7 P's!  Proper Prior Preparation Prevents Piss Poor Performance (for those of you who didn't know the 7 P's).  Have all your supplies ready.  Pre-measure things.  Have your canning gear ready to go.  Fill things with water and get them boiling.  Because you just know you're going to want to do something and you're going to have to go find it, because canning crap is usually at the bottom of a pile in your garage or you have to wait for water to boil.  Not fun.  Be ready.

3-Have all your jars and twist-on lids already washed.  Nothing killed an attempt at canning faster than jars that have been sitting in a cupboard for a year. This really is part of the 7 P's, but felt it was important enough that it deserved a specific mention.

Here's my work set up just so you get an idea...

Here is my bowl full of sliced peaches and the box my canning jars were in to hold my peaches that are waiting to go in the boiling water and to hold the pits and be thrown away later.  No time to throw a pit away in the middle of canning.  I have set these in between my sink and my stove.  So on my stove I have a large pot of boiling water and in my sink I have...

A bowl that is directly under a slight stream of cold water that is continuously running...don't tell me not to waste water.  It kept the water cool so I could handle my peaches, it was just a tiny stream and it was available for me to wash my hands whenever I needed to.  That's my paring knife waiting to chop peaches and i was just tossing the skins in the sink to be later dealt with.

Here are the instructions....
Peach Butter

-Cut an X in the bottom of each peach. 
-Toss in pot of boiling water for 30 seconds.
-Take from boiling water and plunge in cold water for a minute or so.
-The peach skins can be pulled right off.
-Slice the peaches, remove the pit and toss in a pot
-Add 1/2 C. water.  Simmer until soft.
-Using an immersion blender, puree until smooth (Ball says not to liquefy...but I'm pretty sure mine were mostly liquefied by the time I was done).
-Add sugar.  And the juice from 2 lemons.
-Cook until thick enough to round up on a spoon (this is what Ball says again...and I don't know what round up on a spoon means.  According to Smitten Kitchen you should be able to put some peach butter on your spoon and it won't slide off for 2 minutes...or if you drizzle a ribbon back into the pot, it won't immediately get mixed in, it'll be visible for a bit).
-Put your canning jars in a 200 F oven (make sure to put them on a cookie sheet, so they don't tip over and are easier to remove...and when you remove each jar, use a set of tongs or something.  200 F is still hot!)
-In the bottom of each jar, put 1 tsp lemon juice.  This is a "just in case" move.  Ball doesn't say to do it, but I want my canned products to be as safe as possible and felt a little added acid was a good thing.
-Ladle in Peach butter, leaving 1/2" space at top, top with lids and then process for the appropriate amount of time.


Yes that's the raspberry jam I made the day prior.  It has been a canning kind of week.

Get canning, it's a trip back in time and worth it.  I promise.

Monday, September 12, 2011

A Ghastly surprise!

My final big fabric purchase of 2011...and boy was it a doozy.  The Ghastlies by Alexander Henry was my final purchase since the great purse tightening and I am so happy I bought it.  I coveted this fabric line last year...and yet did nothing!  So, when it was released again this year I hopped on that ghastly train as soon as I could.

Here is what I bought of the awesome Addam's Family-esque fabric.  And you'll have to tell me what you think of the color-way.  LOVE IT personally. 

The lady in the lower right-hand corner...she is mean.  I would not mess with her...just look at her eyes...she's had a little too much crazy for breakfast.  I love the Mama witch hovering over her son.  You just know he's a mama's boy.

And this nice gent...don't get me wrong but...he kind of looks like my...Dad.  I love that he's walking an invisible dog too!

Family supper.  I love it.  It' just like when my family gets together...except for the spooky servants and the bell.  But...OH...how I wish I had a bell to summon my heart's desires.  I also love the cat lounging at the foot of the table.

If you look closely, pardon the wrinkles of course.  But there are the Weird Sisters in the middle.  The furthest one on the right is looking at you...looking at her...looking at you.  So suspicious.  Don't you wonder what they are up to?

And here is the family enjoying their evening after the tasty supper.  The knitters in the corner kill me.  They are so suspicious...and what are they knitting anyway?  I figure it's something for their...pet. 
And all the rest.  This is the rest of the fabric line, plus the solids that I have chosen to go with my project.  What do you think of the color scheme...MAUVE!!   I mean, I haven't been this into mauve since my next door neighbor decorated her house using a tasteful combo of forest green and mauve.  SEXY!  I so wanted my house to be forest green and mauve.  But, now I get a little taste of the mauve love....in my Halloween decor.  It's perfect if you ask me.  It's kind of a corpse color-way.

Next the problem was...what am I doing to do with all this fabulous fabric?  My sister says it looks Roald Dahl.  I agree.  What's the book about the really gross people and there's a picture of the man's beard and he's got all kinds of nastiness in there.  Gross! 

Anyway, I have all kinds of ideas and pictures for all kinds of quilts...but the problem with this fabric is the pictures are so large, and I love them, so I want to showcase the fabric as well as patchwork.  Mr. Because I Can tells me ever since my Wizard of Oz quilt that I have developed a love for panels...I told him, this doesn't count as a panel.  A panel is yucky and runs across the entire width of the fabric.  This is just cute design.  It's different...clearly.  So I have decided to cut large 15 x 15 blocks for the fun scenes and then do a string-quilt block that's 15 x 15 and have these blocks run 3 across and 3 down in an alternating fashion.

Here's the beginnings...


You might wonder what wild quilt pattern is that?

It's because I forgot to mention I am paper piecing the string quilt.  I love paper piecing.  There really is something satisfying about ripping off the back paper.  It's totally fun...unless you mess up and don't rip cleanly and then it just leaves a giant chunk of paper that's a pain to get off.  So rip cleanly!  Oh, and rip from the outer edges in.  So once you make it to the middle, start at the other end and work in to the middle a second time.  Much easier!

RIIIPPPPPPPP!

Here is the final outcome.

Hope you like it.  Stay tuned for more Ghastly updates!


Monday, August 8, 2011

No technology...no problem.

My kids sometimes have a hard time playing outside in the wilderness with nothing around but...wilderness.  I'm going to sound like an olde-timer here...(like how I spelled olde, that let's you know how legit I am), but when you only had maybe 5 TV channels there just wasn't anything on, unless it was 4 in the afternoon or Saturday morning.  So, we just had to play outside and figure things out on our own.
Mr. Because I Can and I try to make an effort to get our girls outside and away from technology.  We go on a weekly hike up in the canyon nearby so that we can observe nature and get some fresh air.  This is a weekly tradition in the summertime that we love.  Unless there's a moose stampede coming through...or you land on your tush on a very pointy rock...or fall up the trail.  All of these things, of course have happened, but that's part of being in nature.  It's not safe and sanitary. 

Sometimes the most fun is just picking up the biggest rocks you can find and tossing them in the river...unless the river is raging...then don't go by the river. There have been too many drowning deaths this season due to the unusually cool weather which impacted the snow-melt. Use common sense parents! Kids are unpredictable and they just might fall in no matter how well you think you are watching them.


If the water is not flowing 1000 mph, then a little fun around the river is definitely in order.  Especially trying to balance on rocks...


On this particular hike, my girls have a special fort that we go to each time where they pile up sticks for the "mouses".  Or chipmunks, if you aren't my Youngest. (Every flying bug is a bee and every scurrying creature is a mouse according to her).  They bang sticks on tree trunks and just create their own special world.  Mr. Because I Can and I just sit back and enjoy the day for 30 minutes or so while the girls just play.  Sometimes this is difficult for me because I think we have someplace we have to go or something we have to do...but then I just tell myself to simmer down and let the girls play.

Another favorite summer-time activity is my version of camping.  It's going to the canyon for a few hours in the evening, roasting wieners and eating s'mores.  This is my kind of camping.  Low commitment and I don't have to worry whether my Youngest is going to sleep in the tent or not...Cross your fingers, Mr. Because I Can wants to do actual camping this month.  I'm scared.

This is another test for the kids.  No TV.  No Toys.  Just the hillside and Nature.  They have to use their imagination, and from what I have observed, if you don't use it, you lose it.  So, it's one thing to be able to use your imagination with toys, but it's another completely to have to figure out what you can do with what you have on hand...aka...rocks, twigs and dirt.  With a little prompting, the girls were able to enjoy "cooking" with rocks and "seasoning" with twigs and dirt. Then they proceeded to climb every big rock they could find and just run around the campsite like the wild creatures they are.

Spitting cherry pits at the fire.  Good times.  Speaking of pits, I love watermelon.  I especially love seedless watermelon.  It's so easy.  But, I miss spitting the seeds...maybe at your brother or sister...and worrying if you swallow one that an actual watermelon is going to grow inside of you...Thanks Grandpa Jerry for that one.  So I bought a watermelon with seeds for this outing...turns out it was rotten.  So I was a little sad that my kids weren't going to be able to spit their seeds in the fire.  Luckily I had some cherries.  So that's what we brought....
The Zombie Apocalypse.

Another sign that my kids live too clean a life.  My Youngest doesn't know how to eat a cherry properly.  This may be because I didn't let her have anything even remotely dangerous until...this year maybe.  Like a cherry pit.  So, she holds the cherry by the stem and proceeds to nibble around the pit.  What a mess.  But I just tell myself, we're in the mountains, a little mess is what I want.  In fact, the messier the better almost.

And finally the S'mores.  It just has to be.  It's tradition.  It's perfect.

Unless you buy the jumbo marshmallows thinking they will be fun. 


Major problem...they don't melt through.  I guess I could have been patient and kept my marshmallow as far away from any actual glowing coals and flame as possible and let it melt s-l-o-w-l-y...but that's not how I do things.  I am Instant Gratification Lady.  So, unless you are okay taking your sweet time melting your marshmallow, go with the normal-sized ones to prevent a huge, unmelted glob of marshmallow.  This completely ruined my S'more thank you very much.  The girls didn't notice a problem of course.  If it's sweet they like it.  The marshmallow should be gooey through and through.  And warm.  So immediately after removing from fire, apply to chocolate and graham so that it melts the chocolate and makes the perfect campfire dessert.

So, everyone take the time to turn the TV off, get into nature and let your kids free to use their imaginations.  It's awesome seeing what they come up with.
Related Posts Plugin for WordPress, Blogger...