Thursday, October 20, 2016

When you go apple picking


The ladies and I went apple picking this weekend. Quintessential Fall activity, right? Well, this is the first time I've done it. The ladies had fun picking up rotting apples from the ground, climbing trees, searching for grasshoppers, sorting A and B apples and deciding if the worm holes were too big to be a B apple.

Now what do you do when you have a giant pile of apples? You make apple desserts, of course.

First I made this pie

Did I take a picture of it? No. Mostly because it was ugly as heck. I used store-bought pie crust, because easy, and had to let my top crust thaw out then sort of mush the double crimped edges together, it looked awful. Tasted great.  Topped it with a drizzle of cream. Swoon. That's the old fashioned-y thing my family does with apple pie and chocolate pudding. Cream. On top. I'm sure it'd be great on lots more things.

This recipe has you par-cook the apples, and I didn't think it went overboard on spices. No idea what variety apple we used. The person in charge didn't know, so I just went with it. I like that it used both cornstarch and tapioca for thickening.


A few days later, my baby and I made apple cupcakes using this recipe. She gathered her own apples specifically for her apple cupcakes. She wanted to make apple frosting, but I convinced her, because of her great love of pancakes, to use this maple frosting recipe instead.  The frosting is different. It was extremely soft. You use an entire cup of real maple syrup. When I dumped it in the mixer, I felt I'd made a huge mistake as it started whipping. So I upped the powdered sugar. Maybe my butter was a little too soft, but it turned out yummy. Just be aware it'll feel like a lot of syrup.

The cupcakes were a hit! People were declaring left and right they want these for their birthday cake. The cake was moist and heavier than a regular cake.

Be aware though....hand-grating apples is not awesome. If you have an electric grater, use it, save your fingers as well as your kitchen from all the sticky bits of apples flying everywhere.


I didn't peel the apples. If you look closely on this picture (full disclosure, I ate this cupcake for breakfast the next day...and it was so good) you can see the red peel. And we topped them with white pearl candies. Yum!

Sunday, October 2, 2016

It's never too early to start thinking about Christmas

Yes, I know, you rarely expect posts anymore. I've been embarking on an experiment, of the romance novel kind. If anything happens, I'll keep you updated. But, in the meantime, let's talk Christmas.

It's coming, you know.  We have less than three months.


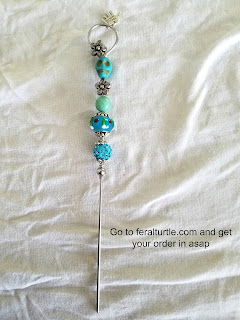
stainless steel cake tester

Mother-in-law, sister-in-law, brother-in-law, you know, those people who you never know what to get? Plus anyone who's into cooking, but has most everything, they don't have one of these!! And people who like to cook and bake love hand-made items. It makes us feel special.

stainless steel cake tester

Don't panic, there's still time!!

Get them a hand-made, food grade, personalized, stainless steel cake tester. And yes, I have two of them. Don't be jealous, you can have one. Karen (the lady over at Feral Turtle who hand-makes these) taps into my wild side with the skulls. If you're not into skulls, that's cool, too.

Go check her out at The Feral Turtle, by clicking here and you can have a quick chat about how many you want to order.

magnetic cake tester

The best part, it's not just a cake tester. Can you see it? It's got a strong little magnet so you can hang it on your fridge and not lose it to the dreaded junk drawer. That way you know exactly where it is, when you need it. Plus it adds a little bling to your fridge art. Yes, this is the actual fridge here at the Hearth. Notices, beautiful art and all.


So what did I do? Made a carrot cake to celebrate the specialness. Had to do it. Used this recipe.


Put the ladies to work grating the carrots...might have been a bad idea. Used fresh pineapple. Yum!


Cake tester in action. Worked like a charm and I felt so pretty using it.


Make sure to add the flour to your raisins and walnuts, otherwise they'll sink to the bottom.


Nom, nom, nom.

K, the thing about Karen, she's like my own personal MacGyver. Not even kidding. Not that she's MY personal MacGyver, but since she's my bff, I kind of think of her that way. But you've got to see the crazy stuff she does, woman is freaking amazing. Have you ever even thought about blowing out a wall in your house, and doing it YOURSELF? No. Nobody thinks that. Except for her.

Alright, enough bragging about Karen, but I could keep going, seriously, how about a little bragging about my young.

making Pusheen

Gah! Can't even stand the cuteness. My baby decided to make her cousin a mini Pusheen because she won't be able to come to the school party in a few days.

Don't know what a Pusheen is? It's a cat.

Making Pusheen

So she went down to the craft room, found the right color of fabric, drew out her Pusheen, had mama cut with her big scissors, sewed it together herself and stuffed it with some fluff. 

homemade Pusheen

Had to make it mini so it could fit in this box. That's Pusheen with shades on. Just want to squish her so much!!

Alright, that's enough. Don't want you to get the idea that I'm actually going to start doing this again, regularly.

Love ya more than carrot cake.


Monday, September 19, 2016

Chocolate toffee Butter Cookies

Speaking of America's Test Kitchen.  These are my all-time favorite cookie.  Chocolate Toffee Butter Cookies.  I make them semi-regularly, and wish I had a batch of frozen dough in my freezer all the time!  They are easy, simple, but oh so good.  They are subtly delicious.  You don't take a bite and pass out from the goodness on the spot, you take a bite and think...nice cookie. Then you find yourself eating another bite, and then another until you've polished off about six in no time flat, and still want more.

They are also the best dunking cookie I've ever had.  Hot chocolate, Coffee...Orange juice but only if you're the Mister.  So good!

Chocolate Toffee Butter Cookie
Adapted from America's Test Kitchen

2 1/3 C Flour
1/2 tsp baking powder
1/2 tsp salt
2 sticks butter, softened, but still cool...this means straight from the fridge and about 10 seconds in the microwave for me
1 C packed brown sugar
1 egg
1 tsp vanilla
1 C. Heath Toffee Bits...they recommend without chocolate, but let me say I love them both ways.  If I have the toffee bits with chocolate, I just don't drizzle chocolate on at the end.  If I have the plain toffee bits, I do like little chocolate razzle dazzle at the end.  Both are good!
1/2 C. chocolate snaps (these are disks of chocolate that do not need to be tempered.  Similar to almond bark, but I like Callebaut brand, no surprise there)

Adjust oven racks to upper middle and lower middle positions.

Heat oven to 350

Combine flour, baking powder and salt in bowl. Set aside

In mixer with paddle attachment, beat butter and brown sugar on medium speed for approximately 3 minutes until fluffy.  Add egg and vanilla and beat until combined.

Reduce speed to low and add flour combo in two additions.  Mix until just combined.

Add toffee bits.  Mix until combined.

Divide dough in two.  Roll each piece into a log that's approximately 9 inches long.  Then smoosh

Line two baking sheets with parchment.

Using a chef's knife, cut dough into 1/4 inch cookies.  They will look quite thin.

Place on cookie sheets.  They don't spread too much due to the chilling, I can usually get around 21 cookies per cookie sheet.  So 3 across and 7 down.

Bake 10-12 minutes until the edges are just lightly browned...make sure you rotate your cookie sheets half way through the baking.

Cook completely on baking sheet.

Once cool, melt your chocolate in a micro-wave proof bowl, I use my Pyrex measuring cups, about 30 seconds at a time until melted.  Drizzle to your heart's content.

YUM!  Really, I don't put a recipe in this blog unless it is stellar.  Make this and find your cookie true love.

Monday, January 25, 2016

Chocolate and Peanut Butter Frosted Chocolate Sheet Cake

chocolate peanut butter frosting
 Do you ever wish you had a go-to frosting that was easy, but darn versatile?  Something you can use on cookies, cakes...straight from bowl to mouth?  Then this is your frosting.  It uses things you have in your pantry....and it's so quick to make, you microwave it!  Whoot! 

Used while still warm over a fresh from the oven cake, it oozes into all the nooks and crannies and sets up soft and pliable.  Cooled down, you can pipe it over cupcakes or cookies for a glamorous look.

Today I'm using this frosting over a chocolate or Texas sheet cake.  I'm not providing the recipe for the sheet cake, so simply find one you like.  I prefer to use This one by the Pioneer Woman, but go with whatever works for you.  When the cake is about 5 minutes from being done, get going on the frosting.  You want the cake and the frosting to be warm at the same time.

In previous posts about this frosting, I've used a double broiler to melt everything...but not today!  Today it's all about making the yummiest frosting the simplest way possible, in the microwave.

 You do need a microwave safe bowl.  That can be glass or microwave-safe plastic.  I'm using a silicone bowl that I got for Christmas.  It's perfect if you make hand-dipped chocolates because the silicone doesn't hold onto the heat like glass or Pyrex does.

Okay, so let's get started.  Your cake has about five minutes left of cook time, and....

Chocolate and Peanut Butter Frosting over Chocolate Sheet cake
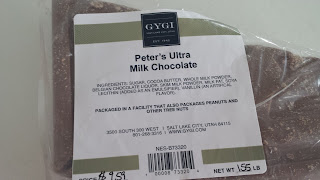
8.5 oz. chopped dipping chocolate or fine quality chocolate chips
4 Tbl. Creamy Peanut Butter
3 Tbl. softened butter
Handful of salted peanuts, chopped fine

**You don't have to be terribly particular about the measurements here.  If you have a bit more chocolate, that's fine, and I never actually measure my peanut butter.  Have you ever tried getting peanut butter out of a measuring spoon?  It's the worst.  I just throw in what looks to be 4 Tbl, and then taste it to make sure it's delicious.**


Chop your chocolate into smallish chunks.  You don't have to be too obsessive about this because you're melting them in the microwave.  If you were going to use a double broiler, then I might say cut them fine to save some melting time.  If you notice my fancy chopping tool, it's called a chocolate chunker, and if you regularly cook with large blocks of chocolate, it's a finger saver.  Urmmm....

Place chocolate, peanut butter and butter in your microwave-safe bowl.  Heat for 30 seconds at a time, remove from microwave, stir and check the consistency.  You want it to be nice and liquid-y smooth.   No chunks.  The reason you are heating in 30 second increments is you don't want to scorch your chocolate.  I think mine took about 1 minute and 30 seconds to get to the consistency I wanted.

Add peanuts and stir until they're coated.


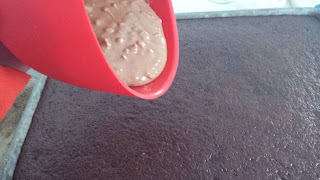
The second the cake gets out of the oven, make sure it's on a level surface and then pour all the creamy, gorgeous frosting over the warm cake.  Using an offset spatula, spread the frosting all around until it covers the cake.  Be careful not to puncture the cake with the peanuts or your spatula and then let it sit and cool.

I did not lick the bowl clean....my kids did.

Once cooled, the frosting will have firmed up a bit and is the perfect foil for the rich, chocolate cake.

Serve with a scoop of ice cream and you'll have the best dessert around.  It's not too sweet thanks to the peanut butter and salted peanuts and for those of us who aren't impressed with big globs of sickeningly sweet frosting, this is perfection.

Thanks for reading!

Heather

Related Posts Plugin for WordPress, Blogger...