Sunday, December 23, 2012

Resolve to Stick to your Resoltuions This year...by Heather at Inspiration Cafe

Hi guys, it's my turn over at Inspiration Cafe, come check out some of my resolutions and how I am planning to stick to them this New Year.


"Hi everybody, it's Heather here from The Beating Hearth and I am going to talk about something we're all going to have on our minds in about...oh, I don't know, depending which hemisphere you hail from, 8 or so days.

New Year's Resolutions. 

To some, that's a dirty word.  Many people resolve not to make resolutions.  But, I like them.  I like the idea of being able to make myself a better person starting....NOW!

So, here's some of my resolutions...and some tips on how to make them a little easier to stick with.

LOSE WEIGHT


Yeah....the dreaded one.  But one that is so important!  Okay, so here it is.  I have lost 60 or so lbs, back in the day, and I maintained it until I had baby #2.  So, this is one of my resolutions this year because I need to lose...60 lbs again.  I am back where I started.  Ugghhh!!!  What have I learned about losing weight?"

Please click here to read more...
 

Tuesday, December 18, 2012

Easy Holder for your favorite photos...Guest post by Danni from Silo Hill Farm

Thank you so much Danni!!  This is gorgeous and I think it would be the perfect present for somebody who works in an office and likes to display favorite photos, or as a cute display on a mantle or hutch.

Everybody, definitely check out Danni's blog over at Silo Hill Farm you won't regret it, she's amazing!

Thanks for reading!

Hello fans of The Beating Hearth!  I'm Danni from Silo Hill Farm and I'm excited to be doing a guest post for my good friend Heather today!
 I wanted to share with you how easy it is to make this cute little wire photo holder.
Let me tell you about the supplies I used.
Bent nosed pliers, Wire Cutters, Beads, Thin Wire, Base, Wire Photo Holder, Small Charm
(Not Pictured...sm. amount of clay, single hole button)
The base that I used is actually a taper candle holder that I picked up on a clearance shelf.  A pack of 2 was $1.99.  You could use just about anything that will hold a wire though. (I considered an empty  thread spool.)
The wire photo holder came from a thrift store.  There were like 12 of them stuck in some kind of heavy base.  I clipped them off to use individually.  I see them at all most every thrift store I've ever been in, in some form or another.
I'm not a jewelry maker by any means, but I have learned a few things.  I cut a piece of wire and made a wrapped loop in one end.
Then I opened the jump ring on the charm I wanted to use and closed it back around the loop I had just made.
Add the beads on to the open end of the wire and then make another wrapped loop around the end, fastening it on to the wire photo holder.
 To make the wire stand up in the candle holder, I made a little ball of clay and pressed it down into the opening where the candle goes...
.....then, I covered it up with a single hole button!
I just stuck the wire down in and the clay held it upright just fine.  Now all I needed was a cute picture to put in it and I was done!
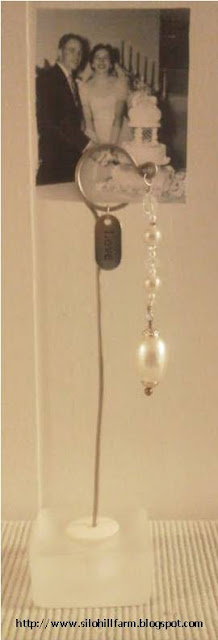
 I did this as a Christmas project, but you could use any beads and charm and make it into something else.....
How about this one with pearls and a "love" charm as a wedding or anniversary gift?
 
Thank you so much Danni!! This is gorgeous and I think it would be the perfect present for somebody who works in an office and likes to display favorite photos, or as a cute display on a mantle or hutch.

Everybody, definitely check out Danni's blog over at Silo Hill Farm you won't regret it, she's amazing!

Thanks for reading!


Tuesday, December 4, 2012

The Most Wonderful Soup of the Year!

I am working hard on becoming more of an intuitive cook.  This practice lends itself well to the making of soup.  I mean, what is soup but whatever you have on hand and water?  I know my Great Grandmothers wouldn't have given the making of soup a second thought, they would've just done it, dang it. They were hardy women who knew how to feed and clothe eight kids on a miner's pay. Warshed their clothes on a warshboard ever' day. The work they done was hard, at night they'd sleep cause they were... tard...

Oh wait, that's somebody else's story, but you get the drift.  I shouldn't have to give soup as much thought as I do.  So, instead of googling a recipe, I did what felt right. And dang was it good!

If you don't have some of the ingredients I used, figure something else out.  It's okay, I promise.  Lets be pioneer women... errr.... you know, the old school kind. Not the super-fancy blogger who takes pictures of every blooming step.  I'm just saying, I think we can pull up our big girl panties and just follow directions. Sorry. Sometimes I think we don't need pictures of every single step. 

Moving on.

The quantities I give here are what I used, but don't fret them too much.  It's okay to use more or less of something.


Pepper chunks. For flavor.

The soup mix I used.  It was awesome.  Imagine all the beans, lentils, barley and GROATS. It's got all of the things.
See! Looks good, huh?

Really Good Beef and Vegetable Soup

1 1/4 lb. Chuck cut into 1 inch pieces
1/2 C. Seasoned flour.  I used some garlic salt and pepper for seasoning
1 onion, diced
5 medium sized carrots, cut into coins
3 ribs celery, chopped
1 8 oz can tomato sauce, mine was seasoned with basil, garlic and oregano
Few dashes Worcestershire Sauce. Don't go crazy here.
Chicken Base, about 2 Tbl.  You could use bouillon cubes if that's what you've got
Parmesan rind (I was seriously being fancy.  But, I love that my grocery store sells what is basically garbage. And I bought it and loved it!)
1/2 Anaheim Pepper cut into large pieces. I happened to have 1/2 of an Anaheim pepper, but absolutely loved the flavor it imparted to the soup.  I didn't want to actually eat pieces of pepper, I just wanted the essence.  That's the reason for the big chunks, you're going to fish them out at the end.
1 1/2 Cups Mixed beans and grains Soup mix (not seasoned, just the beans and grains)
Water. A bunch of it. You'll have to use your judgement on this one.  You want to have your pot filled about 2 inches from the top.
salt and pepper
Oil

In a large pot heat up several tablespoons of oil over medium high heat.  I would say 4 Tbls. probably.  When the pan is good and hot, take your beef cubes that you have rolled around in your seasoned flour, a piece at a time, and shake off the excess flour.  Then put them in the oil. Don't crowd the beef.  You want to cook the beef in batches, the reason for this, is you want your beef to brown and get awesome, not steam it which is what you'll do if you put the entire batch in at once.  Brown each piece, more or less, on all sides.  When browned, remove to a plate.  Finish browning all the beef.  If you have to add a touch more oil to the pan, go ahead. 

Notice all the browned goodness in the bottom? This is flavor.  Add some water to the bottom of your pan to prevent the browned stuff from burning.  Start filling the pot with ingredients.  Add the onion, carrots, celery, and browned meat.  Throw in a couple pieces of Parmesan rind. This is going to add some serious flavor and thicken the soup a bit.  You'll pull these out when cooking is done. Throw in your pieces of pepper and  your beans and grains mix.  Add your tomato sauce and a few dashes of Worcestershire Sauce.  Now fill up the pot with the rest of the water.  Leave about 2 inches up at the top.  I would say, don't really season it with salt at this point.  Let it simmer for a bit and then taste it.  You don't want your soup to be too salty!!

Bring to a boil.  Then reduce the heat to low and let it simmer with the lid on and slightly ajar for about 2 1/2 hours, or until your beans are nice and tender. The bean package told me 1 1/2 hours...apparently I like my beans more tender than they do.  Make sure to check the seasoning level.  You don't want bland soup, but at the same time, you don't want soup that's too salty.  You want it just right.

Devour the tastiest soup ever!  Serve with The Best Drop Biscuits and you will be in bliss.  My husband swore his eternal devotion to me again last night over this supper.  It's always good to wield your power...but only for good!!!   Although, I would like to have a brand new sewing machine...  hmmmm... no, no.  Power for good, not evil.


Thanks for reading!


Follow me on Instagram.
Instagram

Also,

Friday, November 30, 2012

Doing it...MY way.


In all my times as a quilter, I have never enjoyed teensy, tinsy applique.  For one, it's tedious to do.  And, for another, it's so hard to get something perfectly sewn.  Now, I am not a perfectionist, by any means, and what I am about to show you will testify to that.  But, I do want what I am making to look as good as possible.  I love a crisp corner and a sharp point.  I thrill at a perfectly round circle.  So, in the case of itty-bitty sewing, I've made a compromise.


This is one of the few times I am going to willingly show you where something didn't turn out quite right...and this is because I've re-done the entire block.  If you'll notice the carrot nose in this one, it's kind of lumpy and the tip isn't a nice sharp point...and you can see my pencil marks...right then.  Not amazing.


What it is now.  I have decided, since this quilt is a wall-hanging and won't be used for snuggling and keeping warm and won't be washed, that felt is just fine.  As you can see, you can cut out a piece of felt and it won't fray.  I didn't even take the time to do a blanket stitch around the edge, I just took some matching thread and tacked the felt piece in place with a few well-placed cross stitches.  So easy.  So quick...and it looks sharp.


Here's another bit on my original that I am exceedingly displeased with...spots like this glove where you have a concave curve.  It sharply turns up after the curve and there is no way to appropriately sew that down with applique.  So, you have to kind of use little stitches around the curve and hope nobody looks too closely.


Here they are, side by side.  My new one which is iron-on transfer, tacked on using a blanket stitch and using felt for the small bits, and my original which is 100% applique.  I could have iron-on transferred the small pieces on the new one and gotten the crisp look I wanted, but I didn't want to blanket stitch around them all.  The felt, really is me being exceedingly lazy.  But, I want to enjoy my crafting, so I knew that sewing around every coal eye and button and carrot nose would make me crazy.  For the safety of my family, felt was the right choice.

I hope you'll agree, my new one is much better than my original. 

So, moral of the story...if you hate something, don't do it.  Change it to suit your pleasure.

Thanks for reading!


Heather

Tuesday, November 27, 2012

p.s. Women love jewelery

So, if you've got some women or girls in your life who need a present...maybe in the next month or so...then let me recommend you to the lovely Natalie from Northshore Days.  Not meaning to brag or anything...but I happen to be her friend.  That's right.  She lives in New Zealand and has about the cutest kids you can imagine...plus on top of all that she's freaking amazing at making beautiful jewelery.

Pssstt...I have a secret.  A package just came in the mail for me...from New Zealand...wanna see...


Don't you love it when you get something and it's packaged pretty.  It just makes it so much fun to open up...


She is seriously a genius.  I told her my girls love purple and pink.  My Youngest...only LOVES unicorns.  How cute is this pendent?


And my Oldest LOVES ice cream.  They have been telling everyone we see that they got a present from a lady across the oceans!!! 


And look at mine...sigh...  So pretty.  I love the combination of beads that she chose and the shell is so beautiful.  The craftsmanship is excellent!

Let me show you these beauties in action...


And yes...this is my family in action.  This is a typical lazy day.  Hair's not done.  Face Paint smeared from the previous day's fun.  A stick.  Gotta have a stick for some serious play.  And now add to it beautiful jewelery!


If you're like me, you're into the layered bracelet look.  So this is the two I got from Nat plus one of my own.  Pretty freaking gorgeous!!

Thanks Nat!!!!  Love ya!!!


Heather

Thursday, November 15, 2012

Stevie Nicks....Chrissie Hynde...Patti Smith...Blondie

***After you've read this post, please check out Serenity Now with Grace Grits and Gardening over at Inspiration Cafe.  I enjoy pilates, but have never gotten into yoga...I may just have to after this.***

I am a child of the 70's...but just barely....as I was born at the end of the decade.  But, even though I can barely lay claim to the 70's, the music of the 70's laid claim to me.  I grew up listening to Fleetwood Mac, The Moody Blues, Neil Diamond, 3 Dog Night, and David Bowie.  The 80's music never suited my style because of what I was jamming out to in utero.  Thanks Dad for rocking the vinyl even to this day.

I was the lucky winner of one of Hawthorne Threads giveaways!  Imagine my thrill and delight when I read their weekly newsletter and there was my name, having won a fat quarter bundle of Pat Bravo's Rock N Romance fabric.  Be still my heart!  


It came in the mail today....oh yeah, all that!

The package opened  and all of a sudden my head was filled with...

"Because the night belongs to lovers
Because the night belongs to lust
Because the night belongs to lovers
Because the night belongs to us"


and...

"You can go your own way!
Go your own way"


and...

"Gonna use my arms
Gonna use my legs
Gonna use my style
Gonna use my sidestep   *****for the record I've always thought it was use my sassy...sidestep makes more sense*****
Gonna use my fingers
Gonna use my, my, my imaginations

'Cause I gonna make you see
There's nobody else here
No one like me
I'm special so special
I gotta have some of your attention give it to me!"


Oh yeah, baby.  If I had been 13 or so during this decade, I can just see me now...rocking my flared denim, a sweet floral print shirt (not unlike some of the prints in this collection), Farrah Fawcett hair while watching "Little House on the Prairie" and rocking out with my vinyl or 8 Tracks to any of the music listed above.


Alas, I grew up in the 80's so I rocked neon...jelly shoes...BIG BANGS...and I rolled the cuffs of my jeans....and my t-shirts...cassette tapes...and Growing Pains.


So, I am going to embrace the decade of my birth and make something seriously far out using this gorgeous fabric...can you dig it?


And I can't wait.  There's something refreshing about the color pallet Pat Bravo chose.  It's mellow....yet cool...totally retro...and yet modern at the same time...and completely different from what I've got in my fabric collection.

Thanks for reading and thank you so much to Hawthorne Threads...without a doubt my favorite, go-to site for amazing fabric.


Heather

Wednesday, November 14, 2012

Swoon....Done.

swoon quilt

Love.  Swoon has been such a fun quilt to make.  Once I got it figured out, it was fairly painless to construct it.   The best part about this quilt, was I used fabrics I had completely on hand.  I didn't buy a single fabric specifically for it.  Now that's a good thing.  It was also fun to hand quilt it.  I really got to enjoy the pattern and cute fabrics I chose.


I left you hanging about what binding fabric I was going to choose.  Well, there you go.  I went with the grey with aqua dots.  It was such a close call between this one and the golden rod...but I didn't want the binding to take anything away from the beautiful pattern.  So I went with understated.  Plus, it is going in my bedroom and I want peaceful colors there...mostly....unless you look at the quilt which is very bright....never mind what I said about understated.  I hate understated.


One of the reasons this quilt took so long...I decided to add several borders to the quilt, all mitered.  I like the look, but dang, this added to the time it took to finish it.  I probably won't be inspired to add four mitered borders on a quilt again in my lifetime.  The reason I added these was the quilt wouldn't have fit my queen bed otherwise.  Even as it is...it's a pretty close call.  I had meant to add one more in white...but...I had had it by this point.


Obviously it's pretty cozy for a kid sick with croup.  Poor thing.


Ooops!!  Too much messing around by Mama.  Sorry kiddo, go back to sleep.


So happy it's finally in place.  Completed and ready to keep us warm all winter.

Thanks for reading!


Heather

Saturday, November 10, 2012

Napkins for the Feast

cloth napkins pocket
Something I love about holidays, is the chance to class things up a bit, just for one day.  Fresh flowers decorating the front room, new soap in the bathrooms, specifically made for whatever holiday you're celebrating, your finest silver and china on display.  So, what's the next step in classing things up...cloth napkins.

Now, I could buy cloth napkins, but that is so not me.  So, of course I am going to make them myself.  I wanted them to be a bit fun and have a splash of color to add some festiveness.  I thought, how much fun would it be to make a silverware pocket on the napkin itself.  So, that's what I did...

I did a bit of research on how big a formal cloth napkin should be.  They are approximately 20 inches by 20 inches.  That is seriously huge.  So, I battled.  My need to be classy with my need to not use a hundred yards of fabric.  I met somewhere in the middle.

Supplies needed for Feast Napkins...

1. Enough white cotton and enough patterned cotton for as many napkins as you want to make.  I can get 9 napkins, measured 13 x 13 in a yard of white fabric.  So if you only need to make 9 napkins, you would need 1 yard of white and 1 yard of patterned fabric.

2.  A selection of jewel-toned fabric cut in 1/4" lengths.  Whatever colors you like.  I have magenta, plum, deep turquoise, pumpkin orange and lime green.


 Measure out your cutlery.  As you can see, mine came to 3 inches wide.  So, I cut my jewel-toned fabric 3.5 inches by 4.5 inches.

Then, fold each side over approximately 1/4".  This is something I just eye-balled, but you can be more accurate.  Iron it down so that the seem holds the crease.

 Do a scant stitch across the top of the pocket. 

 Now, to get your pocket to line up evenly, I drew a line 2" from the bottom of the 13 x 13 inch square of white fabric with an erasable pen.  Then I drew a line straight down in the middle of the white fabric.

Draw a line straight down your pocket, directly in the middle.  Now line things up.  Put the bottom of the pocket on the line that goes across.  Make sure the line down the middle of the pocket lines up at the top and the bottom.  Pin it down. 

Starting at the top, stitch a scant seam around the remaining 3 un-sewn sides of the pocket.  Make sure you've got your seam allowance tucked behind the pocket.  Backstitch at the beginning and the end.

Take your back piece of fabric, and lay it on the white fabric.  Front sides together.  Pin securely all the way around.

You are going to leave an unsewn space of about 3".  The reason for this is because you need to flip your napkin right side out.  So, to mark where I am going to leave the gap, I just do an X with pins.  I start at one X and sew all the way around and stop at the 2nd X.  Make sure to backspace at the beginning and end so you don't rip out stitches.

Sew around the edges using a 1/4" seam allowance.

Flip it inside out.  Make sure to poke out your corners. Now, Press the seams, making sure to press the unsewn space with the seams like you want them to look.  Do a scant stitch around the entire edge of the napkin.  This does two things, it gives you a decorative edge of stitching, but it also closes up the space that's left.

Done.  If you think this looks like too much work, don't worry, it's actually a seriously quick project.  Once you get going, you'll be surprised how quickly you get these completed.

See how nicely they fit.  See how even the lines are on your pocket!!


Get creative.  I tied my napkins with a gold ribbon, placed them on top of the plates and called them gorgeous.

Try cloth napkins this year...classy!  Big time.

Shared here:


Heather


Related Posts Plugin for WordPress, Blogger...