Showing posts with label Pie. Show all posts

Monday, November 24, 2014

Pie so cool, you don't even know how cool it is

Thanksgiving is nigh.  In fact, I told my kids what we were going to be doing on Thanksgiving Eve, and they informed me that there's no such thing as Thanksgiving Eve.  I guess they know better than I do.  FYI, on the eve before we give thanks, my young and I will be making pecan pie, and so should you.

This is my slice of pie du jour.  The gourd pie may get all the glory, but this is the unsung hero, if you ask me.  Made correctly, pecan pie is a pleasantly sweet, caramelized fusion of velvety custard and lightly toasted pecans.  Made incorrectly, pecan pie can be a gelatinous, overly sweet mess.  Let's do it right, shall we?

There are a couple things you need to know before you make pecan pie.

-Watch for over-browning.   If you are moving past golden brown and delicious, but your pie is still too jiggly in the center, throw on a piece of foil to keep it from browning further. Once the pie filling is no longer liquid, and the crust is nicely brown, throw on the foil.  I usually do this with about 25 to 30 minutes left of cooking time.

-Take the pie out of the oven before it is completely firm.  You want the tiniest bit of give in the middle, but no wiggle on the sides.  Got it.  Because it's all about the bass, 'bout the bass no treble...Darn, catchy song.

-Do not pre-toast your pecans.  I have made many pecan pies in my time and have tried a lot of different methods.  If you toast them and then bake them in the pie, in my opinion, you end up with dry nuts.  Ew.


Pecan Pie
1- 9" pie crust, unbaked (I use store bought.  Shhhhh don't tell)
6 Tbl. Butter
1 Cup corn syrup (I use light because it's what I have on hand and it tastes great, so why mess with anything else?)
3/4 C. Sugar
3 eggs, whisked
2 tsp. Vanilla
1/2 tsp. Kosher salt
2 Cups, chopped pecans

Heat oven to 350 F. Place a cookie sheet in to get hot.  You are going to put the pie on the cookie sheet as it cooks just in case any filling bubbles over.  You don't want that in the bottom of your oven.

Put your pecans in the uncooked pie crust.

In saucepan heat butter, corn syrup and sugar over medium-low until the butter is melted

In another bowl, combine your whisked eggs, vanilla and Kosher Salt.  Here's the slightly tricky part.  You are going to add your melted butter mixture to your egg mixture, but you do not want to cook your eggs, so make sure the melted butter isn't at all hot when you're pouring it into the eggs, whisk constantly.

Pour your filling over the pecans in the pie crust.

Bake for between 60 to 80 minutes (I know that's a big time difference, you just have to watch your pie carefully.  I cooked mine for about 67 and it was pretty perfect), in the center of the oven until (like I said above), the pie is nicely golden and just a bit soft in the middle.  Let it cool completely (I am cooking it the night before which is perfect if you don't have a lot of time on the day of the feast).  Probably better would be to cook it same day, just make sure you give yourself plenty of time to bake it and let it cool for at least 2 hours before eating.


Serve with a dollop of lightly sweetened whipped cream and you will be the hero of the day.  The pie is quite sweet, so take it easy when you're adding the sugar to your homemade whipped cream. 

Thanks for reading and Happy Thanksgiving!

Heather

Wednesday, July 17, 2013

Gooseberry Pie Time

If you're not related to my Grandma Evelyn then you may not know what a gooseberry is.  But today I made a gooseberry pie. And it rocked.  So, get out to your farm stands and farmers markets, and snatch up all the gooseberries. Before I do.

homemade gooseberry pie
I would compare this pie to a tart cherry pie, but better.  Trust me. 

Now for a tip on gooseberries.  You have to pick them over.  Say what? 

Let me introduce you to a gooseberry.  See, there's a fluff end and a stem end.  Using your fingernails, pinch them off at the berry base.  That's it.  You don't want these in your pie.  Yuck.  So take the time to pick em over.

Now for the pie.

Step 1. Make your favorite pie dough for a two crust pie. If you need a good pie crust recipe, please use my favorite recipe located...here... as it will not fail you and is tender and flaky and all that is good in a pie crust. Plus, you can choose to use Crisco or Lard with your butter. Options are so nice. Put the crust in the fridge as you make the filling. A nice cool dough will cook up so beautifully. 
Buy a store bought pie crust. I am over making pie crust.


Step 2.  Filling time.  Recipe as follows...


Fresh Homemade Gooseberry Pie
3 cups ripe gooseberries (remember to pick them over)  I used two half pint cups and ended up with close to 3 cups
3/4 Cup Sugar
3 Tbl. Honey
3 Tbl. Cornstarch
Pinch of Salt
2 Tbl. Butter

Preheat oven to 450 F.

Put all the ingredients except the butter into a saucepan and cook over medium heat.  While cooking, smoosh the berries with the back of your spoon.  You don't have to crush them all, but get most of them.

Just bring to a light boil and when mixture starts to thicken, remove from heat.  Stir.  You don't want this to burn.

Now, pour your filling into the bottom crust.  Dot the filling with the reserved 2 Tbl of butter.  Top this with the top crust.  Crimp the edges.  Cut slits in the top crust for steam to vent.  I use the 3 slit method.

Top pie loosely with foil and place in oven and bake for 10 minutes.  After 10 minutes have passed, turn temperature down to 350 F,  remove the foil from the pie and cook until the crust is a lovely golden brown.  This took me approximately 20 minutes.  Pay attention, a burnt crust might be the end of the world.

Let pie cool.  This is an important step.  While it is cooling, the pie is finishing its cooking and thickening up and becoming a thing of beauty.

Serve with vanilla ice cream or freshly whipped cream.  Yum!


Thanks for reading.  Hope you can find some gooseberries and give them a try.  They're an old timey food that I think are fun and unique, and definitely due for a comeback.  Check out your local farmer's market because chances are they won't be at your super market... unless your super market is the raddest.


Thursday, March 14, 2013

Time for Pi

3.14159265359

Know what that is? It's pi. Know what day it is...3-14...otherwise known as pi day. So, obviously there's nothing else to do but...make pie. Here in the US we are kind of devoid of any delicious and fresh produce to make pie at this time of year, so I'm going to show you my pie that dreams are made of...Double Chocolate Pudding Pie. Oh baby!  And if you want to make this for St. Patrick's Day this weekend, just put some green dye in the whipped cream.  Perfect St. Paddy's dessert.  This post is long, but that's because there are a few steps to making this pie.  None of them are difficult, but be prepared for a read....but do it because it's worth it.  Trust me.

double chocolate pudding pie

I come from a legacy of fine pie makers...well, one anyway. My Grandma Evelyn is known for making pies and I have the fondest memories of eating pie all year long at my Grandma's house. Whether it was fresh raspberry pie in the summer or Homemade Apple Sauce Pie in the winter, it was ALWAYS pie. And I have failed for so long when it comes to making pie crust. And I was desperate to make a good crust! I have almost achieved that.

My crusts still aren't beautiful, but they are tasty! So, I am almost there! Use This Tutorial when making your crust, especially if you live in the dessert.  If you have zero humidity in the air, it makes it very difficult to get an amazing crust.  This will change your life.


The first step to making Heaven in a pie, is to make your crust and blind bake it.

Here are the instructions for blind baking pie crust.

Blind Baking Pie Crust
Heat oven to 425.
Place your pie crust in the pie plate, I use and love the Pyrex pie plates. Crimp the edges if you're fancy.
Place parchment paper over the crust and fill it with pie weights, or be like me and use uncooked beans. This will keep your crust flat and smooth during baking. Bake for 15-18 minutes until the edges are lightly browned.
Reduce oven temp. to 375.
Remove the parchment and beans from crust and place back in oven until golden brown all over. This took me approximately 10 minutes.
Cool.
Done.

The picture above is my crust with drippy, hot ganache poured in...this pie has layers and layers of goodness.  Once you've baked your crust and let it cool, it's time for the ganache.

Ganache Recipe adapted from Martha Stewart Living Enough to coat 2 pies
5.5 oz coarsely chopped dark chocolate (use the good stuff...and don't make the same mistake I did and coarsely chop the chocolate too coarse. It needs to be fine enough to melt fairly quickly)
2/3 C. Heavy Cream
Pinch of Salt

Have your chocolate chopped and ready and waiting in a nearby bowl with the salt in it.
Bring your cream JUST to a boil.
Pour the hot cream over the waiting chocolate. Let it sit without touching it for 10 minutes. If you decide to stir early, it can cause your ganache to go grainy.
Whisk the cream and chocolate until smooth and shiny. This will emulsify the cream and chocolate and complete your ganache.

Pour the ganache into the cooled pie crust and twist the pie plate around and around until the ganache has evenly coated the pie along the bottom and up the sides. Swirl until the chocolate has begun to settle a bit and won't all pool in the bottom once you stop the swirling.


Chocolate coated pie after spending a night in the fridge.   The nice thing about this pie is that you can make it partially ahead of time.  Blind bake your crust and pour in the ganache the night before and you'll be ahead of the game!

Now for the pudding part...


Remember the 7 P's when it comes to this pie. It is very important. Proper Prior Preparation Prevents Piss Poor Performance. It is very necessary to have your chocolate chopped and ready to go. Have your vanilla sitting there waiting for you and have the necessary tools that you are going to need. Today instead of using all Caullebaut Dark Chocolate, I used 1/4 Callebaut milk chocolate to make it a little more kid friendly. My Youngest not only licked her spoon clean, but when she saw Daddy and his taste of pudding, decided she would trade him her spoon (already licked)  for his. He feels he got the short end of the stick on that deal.

I mostly used Smitten Kitchen's Best Chocolate Pudding recipe. But as she does, I mixed it up a little bit. So here is my recipe and step by step instructions.  My mother tried making this pudding and she followed Smitten Kitchen's instructions to the letter and her pie ended up watery, as the pudding never set up. Here's the thing about making home-made pudding or custard. It takes a LONG time!!! So be ready. She used a double boiler as the recipe calls for. Don't use a double boiler. Just use a heavy-bottom pan and be prepared to stir, non-stop, for the entire time!


Make sure you have the appropriate tools. You need a rubber scraper and a whisk. And have the chopped chocolate and vanilla sitting close by as when you're ready to use them you need them handy!

Homemade Chocolate Pudding
adapted from Smitten Kitchen
Serves 6 in pudding form and fills 1 pie shell if you're making pie...so if you're making 2 pies, double this

1/4 cup cornstarch
1/2 cup sugar
1/8 tsp salt
3 cups whole milk ( this is important. Do not skimp and use 1% instead)
6 ounces dark chocolate, coarsely chopped. (Use the good stuff. I like Callebaut
1 teaspoon pure vanilla extract

1. Put the cornstarch, sugar and salt in a heavy bottom sauce pan. Stir to combine. Add the milk slowly, whisking all the while to prevent lumps. Turn your heat to medium. 3/4 of the time I use the rubber scraper and 1/4 of the time I whisk. I make sure to scrape all over the bottom of the pan as well as along the sides and make sure you get the crease where the sides meet the bottom of the pan with your rubber scraper.

The thing is, you don't want your pudding to scorch! This will happen if the pudding sits for too long without having been stirred and will ruin your pudding. Once the pudding heats up a bit, but WAAAYY before it boils, turn your heat to low/medium low. I am too impatient to continuously cook it on low. It really would take forever. But because I am cooking it faster, I have to be extra vigilant that it doesn't scorch. So I will use the rubber scraper for about 3 minutes or so and then for 1 minute I will whisk whisk whisk. I do this for the entire time.


You are looking for the pudding to thicken into a nice thick consistency that will coat the back of your spoon. This is a tricky thing to figure out. Here it is not thick enough. The pudding was beginning to seep back over the line I made. You want it to hold the shape you make in the pudding. You will actually be able to feel when the pudding begins to thicken. As you stir, it will feel different. At this point BE EXTRA CAREFUL!!! and make sure you scrape everywhere all the time!  Pay extra attention to the sides and the spot between the sides and the bottom!!


Here's the pudding at the point I felt it was ready. I hope you can see the difference, it was thick, held it's shape and really did not seep back into the line I made.

2. Add the chocolate! Dump the chocolate in and whisk until combined.


3. Remove the pudding from the stove and add the vanilla. Whisk like crazy again. Once you put the vanilla in, the pudding will look like it's going to separate for a minute, but after you've stirred it in, it will be perfect and thick and delicious!


Like this!!! See how thick it is. It completely coats that rubber scraper and isn't going anywhere!!!


Again, I am the impatient sort, so to help my pudding cool faster, I put it in the fridge. I make sure to whisk it every couple of minutes as it cools. I do not want it to form a skin on the top. GROSS! The reason I want to cool it, is, I don't want it to melt the ganache that's already on the crust.


Once mostly cool, pour into your pie.


Smooth out the tops.


Then put in the fridge to cool...

Ooops...


Make extra sure that you press plastic wrap directly on the top of the pudding. This will prevent a nasty skin from forming and keep your pudding smooth and creamy.

3. Refrigerate for at least 30 minutes.


I wanted to show you the bottom of my pan so you can know what it should look like. As you can see there is nothing that has cooked onto the bottom of the pan. It is clean of any scorched pudding. This is due to diligent scraping and whisking. After having everything prepped and ready to go, this is the most important step.

Once the pudding is fully cooled, whip up a batch of vanilla whipped cream and top the pie with an excessive amount of the good stuff.

Prepare to be in heaven.

Make this pie....and when it comes to be gooseberry season make: Fresh Gooseberry Pie
Thanks for reading!


Heather

Monday, May 7, 2012

For Mom's Day...aka tips on how to make decent pie crust in Utah

We celebrated Mother's Day early and the item my beloved mother wanted me to bring to dinner was my famous Homemade Chocolate Pudding Pie  This pie has reached legend status in my house.  I was only too happy to make it.  Being mostly low-carb means any occasion to eat something full of sugar is something to be savored and enjoyed...especially if it means you get to eat mass quantities of chocolate and fat along with the sugar.  Yay! 

Do not get me started though on the fact that my parent's evil dog Kona decided to enjoy homemade chocolate pudding pie along with us...right then.  I couldn't figure out who would have scooped out a good portion of just the pudding out of the pie...My parent's dog is ginormous.  Only she would have been so wicked.


Oh yes, this is the pie I am speaking of.  Husbands and children....make this for the mothers and wives in your lives...you will not regret it.  You may not know this...but here's a secret...women like chocolate.  I'm going to go a bit further and say almost everybody likes chocolate.  This is chocolate personified.  Yummy!

Okay, so if you want the recipe for homemade chocolate pudding pie, please refer to the link above.  In this post I am going to discuss pie crusts a bit.  Specifically how to make pie crusts in Utah.

Utah is a desert, so the typical pie recipe that calls for...you know, a tsp of water is not going to work here.  So, let's just own up to the dry air that everybody likes to talk up when it's 150 F. outside and how much better dry heat is than humid heat and learn how to make a decent pie crust.  I have adapted this dough and technique from Pam Regentin and her tutorial on The Pioneer Woman and have made it suitable for a dry locale. 

Let me also say that I have tried every possible variation on pie crust and this is the winner hands down.  I have used vodka instead of water, a la America's Test Kitchen.  I have used Shortening.  I have used all butter.  I have frozen my pie dough before rolling it out.  So, just know after much trial and error...this is the dough.

Tuesday, December 27, 2011

Now what?

Do you feel like this once Christmas is over?  There's all this build up for this couple of days and now...I almost don't know what to do with myself. 

You mean I don't have to make a million pillowcases?  I don't have to cook and cook and cook all kinds of decadent, butter-laden delights?  I don't have to scour the Internet for any last minute deals that my kids might pine for?  So...now what?

Here's a recap of my holiday weekend...

My own personal angel.  I like the "halo" that is above her head.  My favorite part of the reenactment of the Birth of Jesus was my Youngest wearing her angel garb and just singing to her own tune while everything else was going on.  We had Herod killing all the boy babies and she was just a singing "Yay Christmas Eve.  Yay Christmas, Christmas, Christmas.  Christmas is good."  And the like. 

Another highlight...my nephews performance of Rudolph kills Santa...oh so classically BOY!

I need to catch up on my Heaven Pie.  here it is in all it's glory.  Topped with freshly whipped cream and ready to be enjoyed.  Rich, rich, rich!!!  Just a small piece will do ya.

The Fam on the Merry morning.

My Mom is a tease.  She realized after having purchased all the Christmas presents for her children that she overbought...FOR ME!!!  So a cookbook I would have dearly loved
Became her present, instead of mine...uhhhh...ex-squeeze me?  I did use it though and made French Onion Soup for dinner on Christmas.  Can I just say YUM!!  But, can I also say...LOTS OF WORK!!!

The amount of time it takes to properly caramelize the onions is 2 hours or so.  Then you have another hour where you are stirring, stirring, stirring and deglazing.  But, if you have the time, definitely make this soup.  Very good!  Oh, and have somebody else chop the onions.  Envision me with tears streaming down my cheeks and Christmas Eve night's mascara running while I attempt to chop 8 onions.  There were big time tears.  Everybody in the house complained and complained about the strong onion smell..that is until they sat in the oven for 2 hours.  Then the complaining stopped pretty darn quick.

Let me just give a quick review of this cook book.  It is amazing.  I love that for each recipe they explain why it works.  Why they did what they did to make it better than all the others.  They also give fun tips like...when cutting onions the only thing they found worked was wearing contact lenses or swimming goggles...right then.  I can just envision me wearing goggles while chopping onions.  not going to happen.  They also give funny behind the scenes tidbits like when Christopher Kimball does a tasting each episode, he actually films an entire day of taste tests starting at 8 am and going until late afternoon.  2 taste tests per hour!!!  His worst day included: coffee, hot sauce, vanilla extract and mail-order filet mignon.  Fun info! 

I also like the way the book is organized.  For example, they don't just lump beef all together.  They give you a section on roasts and a section on one pot dishes and a section on steak.  So you really can just be thinking that you want to make a roast and you can decide beef or pork based on their recipes.  Even though I only had the chance to make one recipe out of this book, I have made several America's Test Kitchen recipes and I am a huge fan.  This book includes every recipe from 2001 to now.  I highly recommend it!

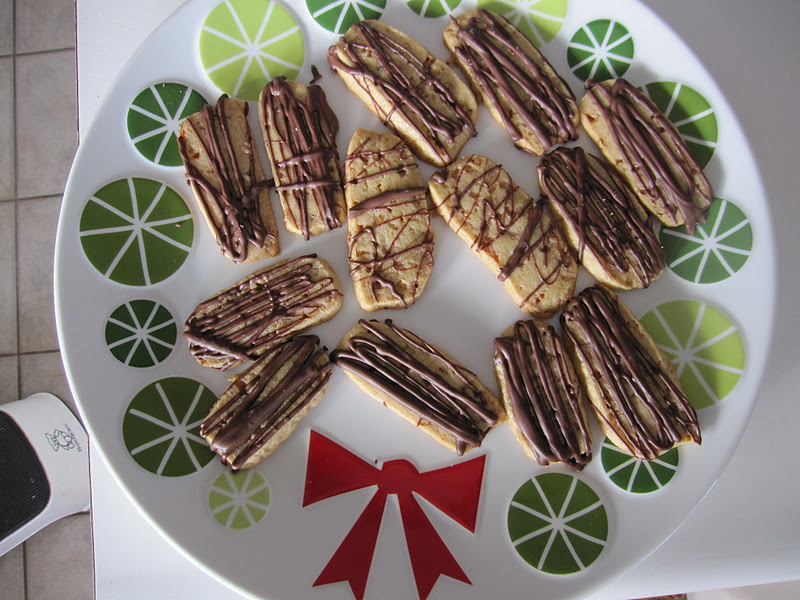
Speaking of America's Test Kitchen.  These are my all-time favorite cookie.  Chocolate Toffee Butter Cookies.  I make them semi-regularly, and wish I had a batch of frozen dough in my freezer all the time!  They are easy, simple, but oh so good.  They are subtly delicious.  You don't take a bite and pass out from the goodness on the spot...you take a bite and think...nice cookie...then you find yourself eating another bite and then another until you've polished off about 6 cookies in no time flat.  And still want more.

They are also the best dunking cookie I've ever had.  Hot chocolate, Coffee...Orange juice maybe if you're Mr. Because I Can.  So good!

Chocolate Toffee Butter Cookie
Adapted from America's Test Kitchen

2 1/3 C Flour
1/2 tsp baking powder
1/2 tsp salt
2 sticks butter, softened, but still cool...this means straight from the fridge and about 10 seconds in the microwave for me
1 C packed brown sugar
1 egg
1 tsp vanilla
1 C. Heath Toffee Bits...they recommend without chocolate, but let me say I love them both ways.  If I have the toffee bits with chocolate, I just don't drizzle chocolate on at the end.  If I have the plain toffee bits, I do like little chocolate razzle dazzle at the end.  Both are good!
1/2 C. chocolate snaps (these are disks of chocolate that do not need to be tempered.  Similar to almond bark, but I like Callebaut brand, no surprise there)

Adjust oven racks to upper middle and lower middle positions.

Heat oven to 350

Combine flour, baking powder and salt in bowl. Set aside

In mixer with paddle attachment, beat butter and brown sugar on medium speed for approximately 3 minutes until fluffy.  Add egg and vanilla and beat until combined.

Reduce speed to low and add flour combo in two additions.  Mix until just combined.

Add toffee bits.  Mix until combined.

Divide dough in two.  Roll each piece into a log that's approximately 9 inches long.  Then smoosh

Line two baking sheets with parchment.

Using a chef's knife, cut dough into 1/4 inch cookies.  They will look quite thin.

Place on cookie sheets.  They don't spread too much due to the chilling, I can usually get around 21 cookies per cookie sheet.  So 3 across and 7 down.

Bake 10-12 minutes until the edges are just lightly browned...make sure you rotate your cookie sheets half way through the baking.

Cook completely on baking sheet.

Once cool, melt your chocolate in a micro-wave proof bowl, I use my Pyrex measuring cups, about 30 seconds at a time until melted.  Drizzle to your heart's content.

YUM!  Really, I don't put a recipe in this blog unless it is stellar.  Make this and find your cookie true love.


Heather

Saturday, December 24, 2011

Pie in the Sky

I mentioned this pie briefly at Thanksgiving.  Let me just say this pie has taken on legend status.  We think about it.  Dream about it.  While eating our oatmeal in the morning, pine about it.  It is quite possibly the best pie known to man.  I'm just saying.

I am going to give you the link for the pie crust tutorial from The Pioneer Woman's Pie Tutorial. Which, let me just say is a life saver. I come from a legacy of fine pie makers...well, one anyway. My Grandma Evelyn is known for making pies and I have the fondest memories of eating pie all year long at my Grandma's house. Whether it was fresh raspberry pie in the summer or Homemade Apple Sauce Pie in the winter, it was ALWAYS pie. And I have failed for so long when it comes to making pie crust. And I was desperate to make a good crust! I have almost achieved that. My crusts still aren't beautiful, but they are tasty! So, I am almost there! Use this tutorial. I find that I want to use a little less salt than she calls for, but that might just be a personal preference.  I also don't use the fancy lard she calls for...but I do use lard and butter. I found my lard in the Latino aisle...after quite an extensive search.


So since my In-Laws did not get to experience the heaven known as Heaven Pie around these parts, I figured it was my duty as a dutiful daughter-in-law to make it for them for Christmas Eve.  Hence the two pie marathon I am involved in today.  It's actually not so bad.  I made the crust and ganache last night.  It is important to blind bake your pie crust.  Here are the instructions for blind baking:

Blind Baking Pie Crust
Heat oven to 425.
Place your pie crust in the pie plate, I use and love the Pyrex pie plates.  Crimp the edges if you're fancy.
Place parchment paper over the crust and fill it with pie weights, or be like me and use uncooked beans.  This will keep your crust flat and smooth during baking.  Bake for 15-18 minutes until the edges are lightly browned. 
Reduce oven temp. to 375.
Remove the parchment and beans from crust and place back in oven until golden brown all over.  This took me approximately 10 minutes.
Cool.
Done.

The picture above is with drippy, hot ganache.  I reduced the amount of ganache that I made from last time.  I followed Martha's recipe and it made a TON of ganache.  I didn't want the waste.  I figured from last time the amount I made would have coated 3 pies.  As I was making 2 pies, I reduced the proportions by 1/3.  Here it is as follows...

Ganache Recipe adapted from Martha Stewart Living Enough to coat 2 pies
5.5 oz coarsely chopped dark chocolate (use the good stuff...and don't make the same mistake I did and coarsely chop the chocolate too coarse.  It needs to be fine enough to melt)
2/3 C. Heavy Cream
Pinch of Salt

Have your chocolate chopped and ready and waiting in a nearby bowl with the salt in it. 
Bring your cream JUST to a boil. 
Pour the hot cream over the waiting chocolate.  Let it sit without touching it for 10 minutes.  If you decide to stir early, it can cause your ganache to go grainy.
Whisk the cream and chocolate until smooth and shiny.  This will emulsify the cream and chocolate and complete your ganache.

Pour the ganache into the cooled pie crust and twist the pie plate around and around until the ganache has evenly coated the pie along the bottom and up the sides.  Swirl until the chocolate has begun to settle a bit and won't all pool in the bottom once you stop the swirling.


Chocolate coated pie after spending a night in the fridge.  

Now for the pudding part...

Remember the 7 P's when it comes to this pie.  It is very important.  Proper Prior Preparation Prevents Piss Poor Performance.  It is very necessary to have your chocolate chopped and ready to go.  Have your vanilla sitting there waiting for you and have the necessary tools that you are going to need.  Today instead of using all Caullebaut Dark Chocolate, I used 1/4 Callebaut milk chocolate to make it a little more kid friendly.  My Youngest not only licked her spoon clean, but when she saw Daddy and his taste of pudding, decided she would trade him her spoon for his.  He feels he got the short end of the stick on that deal.

I mostly used Smitten Kitchen's Best Chocolate Pudding recipe.  But as she does, I mixed it up a little bit.  So here is my recipe and step by step instructions.  The real reason I am posting about this pie again, is my Mother wanted to make this very pie for her co-workers. She followed Smitten Kitchen's instructions to the letter and her pie ended up watery as the pudding never set up.  Here's the thing about making home-made pudding or custard.  It takes a LONG time!!!  So be ready.  She used a double boiler as the recipe calls for.  Don't use a double boiler.  Just be prepared to stir non-stop for the entire time!

Make sure you have the appropriate tools.  You need a rubber scraper and a whisk.  And have the chopped chocolate and vanilla sitting close by as when you're ready to use them you need them handy!

Homemade Chocolate Pudding
changed a bit from Smitten Kitchen
Serves 6 in pudding form and fills 1 pie shell if you're making pie...so if you're making 2 pies, double this

1/4 cup cornstarch
1/2 cup sugar
1/8 tsp salt
3 cups whole milk ( this is important.  Do not skimp and use 1% instead)
6 ounces dark chocolate, coarsely chopped.  (Use the good stuff.  I like Callebaut
1 teaspoon pure vanilla extract

1.  Put the cornstarch, sugar and salt in a heavy bottom sauce pan.  Stir to combine.  Add the milk slowly, whisking all the while to prevent lumps.  Turn your heat to medium.  3/4 of the time I use the rubber scraper and 1/4 of the time I whisk.  I make sure to scrape all over the bottom of the pan as well as along the sides and make sure you get the crease where the sides meet the bottom of the pan with your rubber scraper. 

The thing is, you don't want your pudding to scorch!  This will happen if  the pudding sits for too long without having been stirred and will ruin your pudding. Once the pudding heats up a bit, but WAAAYY before it boils, turn your heat to low/medium low.  I am too impatient to continuously cook it on low.  It really would take forever.  But because I am cooking it faster, I have to be extra vigilant that it doesn't scorch.  So I will use the rubber scraper for about 3 minutes or so and then for 1 minute I will whisk whisk whisk.  I do this for the entire time.

You are looking for the pudding to thicken into a nice thick consistency that will coat the back of your spoon.  This is a tricky thing to figure out.  Here it is not thick enough.  The pudding was beginning to seep back over the line I made.  You want it to hold the shape you make in the pudding.  You will actually be able to feel when the pudding begins to thicken.  As you stir, it will feel different.  At this point BE EXTRA CAREFUL!!!  and make sure you scrape everywhere all the time!

Here's the pudding at the point I felt it was ready.  I hope you can see the difference, but it was thick, held it's shape and really did not seep into the line I made.

2.  Add the chocolate!  Dump the chocolate in and whisk until combined.


3.  Remove the pudding from the stove and add the vanilla.  Whisk like crazy again.  Once you put the vanilla in, the pudding will look like it's going to separate for a minute, but after you've stirred it in, it will be perfect and thick and delicious! 

Like this!!!  See how thick it is.  It completely coats that rubber scraper and isn't going anywhere!!!

Again, I am the impatient sort, so to help my pudding cool faster, I put it in the fridge.  I make sure to whisk it every couple of minutes as it cools.  I do not want it to form a skin on the top.  GROSS!  The reason I want to cool it, is I don't want it to melt the ganache on the crust. 

Once mostly cool, pour into your pie. 

Smooth out the tops.

Then put in the fridge to cool...

Ooops...

Make extra sure that you press plastic wrap directly on the top of the pudding.  This will prevent a nasty skin from forming and keep your pudding smooth and creamy.

3.  Refrigerate for at least 30 minutes.

4.  Which hasn't happened in my house yet.  Whip some cream, top the pies completely with it and devour in 3 bites.

YUM!


I wanted to show you the bottom of my pan so you can know what it should look like.  As you can see there is nothing that has cooked onto the bottom of the pan.  It is clean of any scorched pudding.  This is due to diligent scraping and whisking.  After having everything prepped and ready to go, this is the most important step.

Now, go out there and make this pie!


Heather

Related Posts Plugin for WordPress, Blogger...