Wednesday, February 14, 2018

All because I'm a sucker

Who else is a sucker for their kids?

My baby, looking up at me with quivering blue eyes: Mama, I just love your homemade chocolates.

Me, cold-hearted and steely eyed: You mean those chocolates I only make once a year at Christmas?

My baby, now with pleading hands: You didn't even let me help you make them at Christmas. Can we please make some chocolates for Valentine's. I just really, really, really, really love them, they're the best of all the chocolates. And want to spend time with you, because I love you so much.

Me, trying to remain distant, but feeling my resolve weaken: No, it's too much work. Plus, your hands get covered in chocolate, and it makes a mess of the kitchen. Do you really want to clean up the kitchen on Valentine's?

My baby, tears glistening at the edges of her eyes, and a sly smile spreading: Mama, I always wanted to learn. Don't you always say girls can do anything they want? That we're just as good as boys? Please teach me all your wise ways.

Me, breaking down into sobs: Alright, baby, alright! Of course, we can make chocolates even though they're a huge hassle and dirty every dish in the house. For you, anything.

My baby, turning to the side and exchanging a slick high-five with her older sister,who knows I can resist her ways with greater ease: Thanks mama! You're the best.

Me: Wait, what...

In my defense, this image was what was in my head... Yes, I have photographic proof of that one time I broke my baby's heart. And if you don't follow us on Instagram you didn't get to see our chocolate making fun back when it happened. So, check out the Instagram link down below.

There she is, watching with rapt attention, directly after I'd denied her the opportunity to help make Christmas chocolates. Uggh. You can see why I caved. But, we were making these as gifts and kid hands... shudder.

Yeah, so this is how I've spent my Valentine's morning. Not luxuriating and eating already made truffles. Nope. Making homemade truffle fillings so my kids can really trash the house this evening and dip them, themselves. Here's my dark chocolate approx. 75% melted. I needed to get my chocolate and my cream mixture down to 90 degrees F at about the same time. Extremely tricky, but I got close.

 The insides of a peanut butter truffle. In case you were curious

And the insides of mint truffles. Might have broken my blender on this one. It's because my immersion blender, that I haven't used in five years, wouldn't turn on. It does taste yummy. So, that's something.

Now, wish me luck that my kitchen and I make it out in one piece after tonight. It's not just my two girls, who are blessedly older, but also my three nieces ages 5, 7, and 10. Yup. Five little girls and a big batch of melted chocolate. What could go wrong?

Click the icon to see the chocolaty aftermath on Instagram
Instagram

Also,

Tuesday, February 13, 2018

Who said you shouldn't make homemade puddin'

If you want an easy, but impressive, dessert, go with made from scratch chocolate pudding. Made from scratch anything has a wow factor associated with it, but facts are facts, made from scratch doesn't always translate well. See homemade cakes. Which brings me to wonder, why can't I make a cake from scratch and really love it? I dunno. I've tried. Goodness knows I've tried. Must be some chemical magic in the box mix that I can't recreate.

But, homemade chocolate pudding is another story. It tastes a million times better than store bought. Is made from only ingredients you can pronounce. And is so quick and so easy, but homemade, so you look like a culinary rock star. And who doesn't like looking like a culinary rock star?

I personally love it when my kids chant my name and declare I must open a restaurant that serves cheesy hotdogs, mac and cheese, and chocolate pudding. And yes, I know only one out of those three items are actually homemade by me. Still, I like it.

Scratch Chocolate Pudding
1/4 C cornstarch
1/3 C granulated sugar
skimpy 1/4 tsp Kosher salt
3 C whole milk
1 C good quality Semi-sweet chocolate chips. I prefer Guittard
1 tsp vanilla extract

Combine cornstarch, sugar and salt into medium saucepan and stir to mix.

Pour milk into the above in a slow drizzle while whisking furiously, to avoid lumps.

Cook over medium low heat while alternating between whisking and scraping the bottom and sides of pot with a silicon spatula. You do not want to let this go too long without stirring, as the milk will potentially scorch to the bottom and not taste delicious.

Pay attention. After approximately 10 minutes, and just before your pudding comes to a simmer, the mixture will begin to thicken. Once it coats the back of a spoon and you can leave a trail with your finger, lick, it's thick enough. You really don't want this to go above a barely there simmer.

Now that it's perfectly thick, add the chocolate chips.

Whisk and spatula for about 2 minutes more to allow the chocolate chips to melt and incorporate.

Remove from heat and stir in vanilla extract. It'll look like your pudding is separating, but keep whisking and it'll all come together.

Press plastic wrap directly on the top of the pudding to avoid the dreaded skim and let cool. My Grandma would've spooned it into fancy bowls and let it cool on the kitchen counter, tempting us until dinner was through. I cooled mine in the fridge this time for about an hour. It was still slightly warm when we ate it.

Most important step: top with a drizzle of cream. Yup, pure cream and prepare for old fashioned, creamy, homey, chocolaty goodness in every spoonful. Add more cream as needed.

This really brought me back to my childhood; when I licked the bowls clean. Mostly to savor every last drop of the cream. We ate a lot of desserts with a drizzle of cream over the top. Not whipped cream. Weird but good. But, now I know why my mom got after me for licking the bowls clean. Same reason I got after my kids for doing it.

Aww, love the sharing of an old-timey, family tradition. And to be clear, the tradition I'm talking about is not the licking of bowls.

Follow me on Instagram and see all the fun stuff I don't share here
Instagram

Also,

Monday, February 12, 2018

Trouble shooting homemade yogurt

So, you want to make homemade yogurt, but it seems too daunting. Needing to stick to a rigid temperature schedule or all is lost, gives you heartburn. Maybe you're worried you'll give your family botulism. Or at the very least, you fear everyone who tries it will get food poisoning.

Take it from me, it'll be okay.

homemade yogurt troubleshoot
After the first time, it's easy. Not sitting on the front porch drinking a lemonade, easy. But, sitting on the front porch eating an ice cream cone that you have to lick from time to time because it's hot out, easy. But dang, the ice cream (yogurt) tastes so good, it's worth it.

I've had a time or two when it didn't work out or when I looked at it and thought... umm... I dunno, I'm just going to toss it. But, I think that comes with the fermenting territory. Go with your instincts. That one time I thought the yogurt had a pink-ish tinge to it, it probably didn't. It probably would've been fine to eat, but I'm not willing to risk it for the sake of a gallon of milk.

Then there was the time it didn't thicken, AT ALL. Who knows what went wrong. Too much starter. Too little starter. The milk didn't get hot enough, in the first place. Maybe I didn't cool it enough before adding the starter.

The point is, I've had two maybe three times where I wasted my milk and my time. That's it. And everyone who's eaten my yogurt is still alive. And now I can basically make a batch in my sleep.

It's worth it to me to know exactly what's in my yogurt, milk and starter yogurt. That means no preservatives, no thickeners, and no sugar. And no yogurt tastes as good as my yogurt.

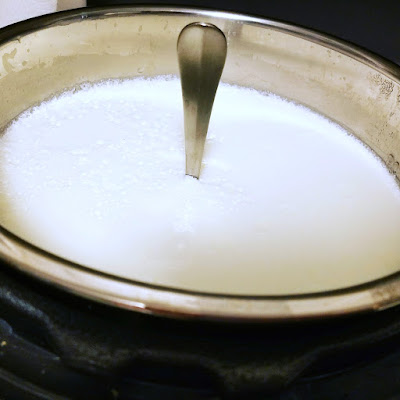
The picture above is my most recent batch just after fermentation. See how thick it is. That's before any straining. That spoon wasn't going anywhere. I wanted to share my experience here because I made several, we'll call them, mistakes in its making.

I didn't let the milk get up to 180 F. It made it to 178 and change F. That was after I selected the yogurt/boil function on my Instant Pot and then let it slow cook low pressure for another 30 minutes. I wasn't about to wait any longer.

It cooled to under 110 F. Which is a little cooler than normal, because I wasn't exactly Johnny on the spot with my thermometer.

I did use exactly 4 Tbl. of starter. So that I got right.

But, I let it go for about 11 hours, instead of ten.

All this just goes to show, I made the perfect pot of thick, tangy homemade yogurt with an imperfect process.

If you're trying the Mediterranean diet, or just want to ditch the sugars in too many commercial yogurt brands, give homemade yogurt a try with this recipe and tutorial. You won't go back to store bought.

Follow me on Instagram and see all the fun stuff I don't share here
Instagram

Also,

Friday, February 9, 2018

Perfectly cooked chickpeas/garbanzo beans

Chickpea or garbanzo bean? I say chickpea. Except when I say garbanzo bean.

As I continue incorporating the Mediterranean ways into my way of cooking, via the Mediterranean diet, I'm becoming more familiar with these versatile legumes. Okay, who are we kidding, I am intimately familiar with hummus... and falafal. But I haven't really cooked with chickpeas myself. I just devour them at every Middle Eastern restaurant I visit.

homemade chickpeas
But not today.

Today we cook chickpeas from scratch.  And not in the Instant Pot, like I had originally planned when I bought the dang thing, because I've been burned too many times, now. Thanks Instant Pot/bean ruiner.

Chickpeas from scratch
1 lb. chickpeas
Small palmful Salt, approx. 1 teaspoon... maybe

First, sort and rinse chickpeas. Beans are packaged au natural. That means they haven't been washed and can include bits of grit. So I just pour the package into a colander and rinse while running my fingers through the beans, looking for anything unsavory. p.s. I've yet to find a rock, but I still do it.

Then, because I am not smart enough to pre-plan, quick soak the beans. If you are the type who is on top of things, you can soak your beans the night before. Or even sprout them. This is something I want to try as I'm really into fermenting. Just not, that into fermenting to have already tried it.

This means, bring eight cups of water to a boil in a large pot. Add 1 lb chickpeas to boiling water. Bring back to a boil and let boil for 3 minutes, or so. Remove pot from heat, cover, and let sit for an hour.

Now, this just gets us to soaked.  They aren't cooked yet.

Drain chickpeas.

Add enough fresh water to cover chickpeas by a couple inches and add your salt. Bring to boil. Reduce heat to simmer and let cook for 1 hour and 15 minutes. This results in a pleasantly tender, but not mush, chickpea.

Use in any number of dishes however you want. You can leave them as is, if you are eating the chickpeas whole, or you can cook them a bit more if you're going to mush them for hummus or even, dare I say it, refried beans for the more adventurous amongst us.

Stay tuned for all the chickpea fun.

Follow me on Instagram and see all the fun stuff I don't share here
Instagram

Also,


Related Posts Plugin for WordPress, Blogger...